Migrate a single WordPress site to a Multisite network
Key points:
- WordPress Multisites allows you to manage multiple websites from a single WordPress installation, saving server resources and centralising administration.
- Always create a comprehensive backup before attempting conversion (UpdraftPlus is recommended).
- To manually convert a single site to a Multisite, you’ll need to modify wp-config.php and .htaccess files as detailed in this guide.
- UpdraftPlus Premium offers a simplified migration path that automates the complex technical process of moving existing sites into your network.
- While manual conversion is possible, using UpdraftPlus Premium dramatically reduces technical complexity and potential for errors.
Are you spending countless hours managing multiple WordPress websites? The constant switching between dashboards, duplicating updates and juggling separate resources can become a significant drain on your time and server capacity. Luckily, there’s a better way.
Converting your standalone WordPress sites into a multisite network allows you to host and manage multiple websites from a single installation. The result is a powerful configuration that gives you centralised control while maintaining unique content across different sites.
This guide walks you through the complete migration process, from manual configuration (editing your wp-config.php and .htaccess files) to using UpdraftPlus Premium’s specialised multisite migration tools. We’ll also cover everything you need to know to protect your data during conversion and ensure a smooth transition.
The goal is to help you create a streamlined WordPress environment that scales efficiently, conserves server space and frees you from the time-consuming cycle of managing isolated installations.
Why convert to WordPress Multisite?
Section titled Why convert to WordPress Multisite?WordPress Multisite lets you run many websites using just one WordPress installation. Available since WordPress 3.0, this setup allows all your sites to share the same core files, database, plugins and themes while each site keeps its own content and look.
The compelling benefits of going Multisite include:
- Easier updates – change WordPress, plugins and themes in one place and it updates everywhere. No need to log into different sites to do the same task over and over.
- Less server space needed – one WordPress setup uses fewer resources than many separate sites, saving you storage and improving performance.
- One dashboard for everything – manage all your sites from a single place with Super Admin powers, making it easy to keep track of everything.
- Matching look and features – keep all your sites looking the same and working the same way without redoing the work for each site.
- Share the workload – let others manage their own sites while you keep control of the important network settings.
- Save money – use one plugin or theme license for many sites instead of buying separate ones for each site.
WordPress Multisite use cases
Section titled WordPress Multisite use casesMultisite works particularly well for:
- Digital agencies managing multiple client websites. Agencies can create separate sites for each client while maintaining centralised control. This setup makes updates more efficient and allows for standardised templates across all client sites without duplicating work.
- Businesses with multiple brands or regional websites. Companies can maintain consistent corporate elements while allowing each brand or region to have its own distinct identity. When company-wide changes are needed, they can be implemented once rather than across dozens of separate installations.
- Franchises needing consistent branding across locations. The parent company can control branding elements, core functionality and design, while individual franchise owners manage their specific content, promotions and local information, creating the perfect balance between consistency and flexibility.
- Educational institutions with various departments and programs. Schools and universities can give each department its own website while maintaining institutional branding and security standards. The University of Illinois at Chicago demonstrates the impressive scalability of this approach, successfully running over 600 websites on a single Multisite network.
Essential preparation: Backing up your WordPress site
Section titled Essential preparation: Backing up your WordPress siteBefore you begin converting your site to a multisite network, there’s one critical step you absolutely cannot skip: creating a comprehensive backup. Think of this as your safety net for the entire process.
Converting to multisite involves modifying core WordPress files and changing your database structure. If anything goes wrong during the conversion, a good backup ensures you can quickly restore your site to its original state.
UpdraftPlus is the ideal solution for creating a complete backup before proceeding with your conversion. With over 3 million active installations, it’s trusted by WordPress professionals worldwide.
To quote one of our happy clients, Partleton Sports:
“Works as advertised, never failed me.”
For a successful multisite conversion backup, you’ll need to include:
- Your complete database (containing all your posts, pages, settings and users).
- Your uploads folder (where all your images and media files live).
- Your plugins and themes (to ensure you can restore the exact same setup).
- Your wp-config.php file, which will be modified during conversion (requires UpdraftPlus Premium).
The standard version of UpdraftPlus handles most backup needs, but for a multisite conversion, you’ll need UpdraftPlus Premium.
Once your backup is complete and safely stored, you can proceed with the conversion process.
Multisite migration made simple
Why risk hours of technical errors when UpdraftPlus Premium automates the process? Migrate single sites into a Multisite network in just a few clicks, with backups, restores, and data handling all taken care of.
How to convert a WordPress site to a Multisite
Section titled How to convert a WordPress site to a MultisiteBefore diving into the technical steps, let’s make sure you have everything in place for a smooth conversion process.
Converting to Multisite requires certain conditions to be met before you begin. Check these items off your list before proceeding:
- Create a complete backup. As we covered in the previous section, this step is absolutely essential. Don’t skip it.
- Verify your hosting supports multiple sites. Contact your hosting provider to confirm they support WordPress Multisite. Most modern hosts do, but some budget hosting plans might have limitations or require upgrades to handle the additional resources a network requires.
- Consider using pretty permalinks (optional, but recommended). While not required for setting up Multisite, pretty permalinks (e.g.,
example.com/sample-pageinstead ofexample.com/?p=123) are widely used for better readability and SEO. You can enable them in your WordPress dashboard under “Settings > Permalinks”.

- Confirm server compatibility. If you’re using Apache, make sure the mod_rewrite module is installed and enabled. For Nginx servers, you’ll need specific directives in your configuration. If you’re unsure about this, reach out to your hosting provider for confirmation.
With these prerequisites in place, you’re ready to begin the actual conversion process.
Step-by-step instructions:
- Connect to your website using an SFTP client like FileZilla or your host’s file manager.
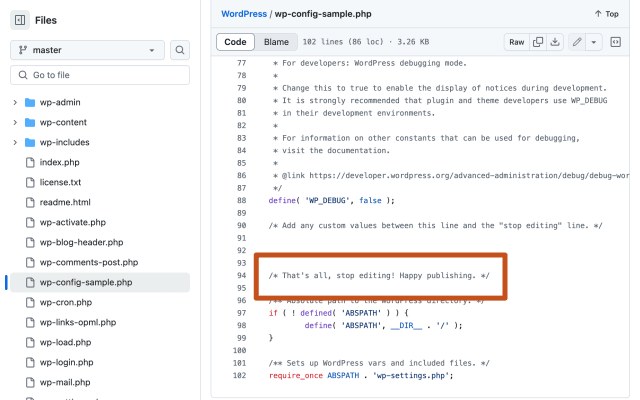
- Locate the wp-config.php file in the root directory of your WordPress installation.
- Open the file for editing and add the following code just before the line that says
/* That's all, stop editing! Happy publishing. */:
define('WP_ALLOW_MULTISITE', true);
4. Save the changes.
5. Log in to your WordPress dashboard as an administrator.
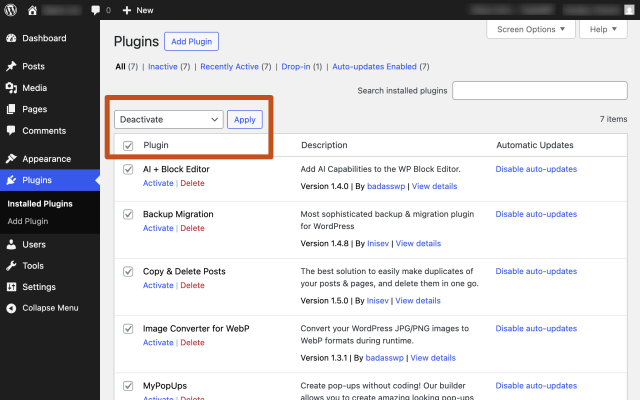
6. If you’re using an existing WordPress site, deactivate all plugins.
7. Navigate to “Tools > Network Setup”.
8. Choose your preferred URL structure for the multisite network:
- Subdomains (e.g., site1.example.com, site2.example.com).
- Subdirectories (e.g., example.com/site1, example.com/site2).
This choice will affect all sites in your network and cannot be changed later without reconfiguring your entire installation.
9. Enter a title for your network and confirm your email address.
10. Click on the “Install” button to proceed. WordPress will now show you specific code snippets that need to be added to your configuration files.
11. Open your wp-config.php file again and add the following code (or the code provided by WordPress) just below the line you added in step 1:
define('SUBDOMAIN_INSTALL', true); // Change to false if using subdirectories
define('DOMAIN_CURRENT_SITE', 'yourdomain.com'); // Replace with your domain
define('PATH_CURRENT_SITE', '/');
define('SITE_ID_CURRENT_SITE', 1);
define('BLOG_ID_CURRENT_SITE', 1);11. Locate your .htaccess file in the root directory of your WordPress installation and replace the existing WordPress rules with the multisite-specific code provided during setup. For a subdomain installation, your .htaccess file should contain code similar to this:
RewriteEngine On
RewriteBase /
RewriteRule ^index\.php$ - [L]

# Add a trailing slash to /wp-admin
RewriteRule ^wp-admin$ wp-admin/ [R=301,L]

# Handle remaining requests via index.php
RewriteCond %{REQUEST_FILENAME} !-f
RewriteCond %{REQUEST_FILENAME} !-d
RewriteRule . /index.php [L]
This configuration ensures proper handling of server requests for your multisite network.
13. Log in to your WordPress site again (you might be prompted to log in after making the configuration changes).
14. Access the network dashboard by going to “My Sites > Network Admin” in the admin toolbar.
15. Navigate to “Settings > Network Settings” to configure your multisite network:
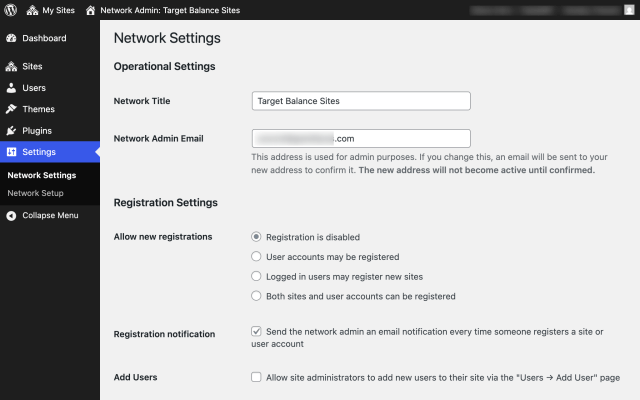
- Registration settings – determine who can register and create sites on your network.
- New site settings – configure default content for new sites in the network (default first post, page and comment content).
- Upload settings – manage file types and sizes that can be uploaded.
- Menu settings – control which plugin menus are available to site administrators.
That’s it – your multisite network is set up!
Your existing WordPress site will become the main site in the network. If you choose:
- Subdomain structure, your existing site remains at its original domain (e.g., example.com), while new sites will be created as subdomains (e.g., site1.example.com).
- Subdirectory structure, your existing site remains at its original URL (e.g., example.com), while new sites will be created as subdirectories (e.g., example.com/site1).
Migrating to a WordPress Multisite network with UpdraftPlus Premium
Section titled Migrating to a WordPress Multisite network with UpdraftPlus PremiumOnce you’ve set up your Multisite network, the next step is populating it with websites. You can either create new sites from scratch or transfer existing WordPress websites into your network. For existing sites, there are two main migration methods:
Method 1: Manual migration (without plugins)
Section titled Method 1: Manual migration (without plugins)The manual approach to migrating existing WordPress sites into your Multisite network is technically challenging and time-consuming. WordPress itself classifies this as “advanced administration” in its handbook, and for good reason.
This method requires:
- Exporting and importing database tables with careful renaming of prefixes.
- Updating all foreign key relationships within the database.
- Running complex search-and-replace operations while preserving PHP-serialised data.
- Moving file uploads to the correct location (/wp-content/uploads/sites/{ID}/).
- Rewriting all media URLs to match the new structure.
- Reconciling user IDs and roles to prevent account conflicts.
- Creating and configuring the subsite with the correct domain mapping.
Each of these steps presents potential pitfalls where a single mistake – a wrong prefix, an incorrect length count or improper file permissions – can cause the entire migration to fail.
Method 2: Migrating with UpdraftPlus Premium (recommended)
Section titled Method 2: Migrating with UpdraftPlus Premium (recommended)UpdraftPlus Premium simplifies this complex migration process into a straightforward, guided experience. What would normally take hours of careful technical work becomes a mostly automatic routine you can complete in minutes.
The plugin handles all the complex database operations, file transfers and URL adjustments that make manual migration so challenging. Here’s why this approach is recommended:
- Dramatically reduces the technical knowledge required.
- Minimises the risk of migration errors.
- Preserves all content, including complex elements like widgets and page builder data.
- Maintains user accounts properly without conflicts.
- Guides you through each step with clear instructions.
With UpdraftPlus Premium, you can efficiently migrate your existing WordPress site into your Multisite network as a fully-functional subsite, without the headaches and risks of manual migration.
Step-by-step instructions:
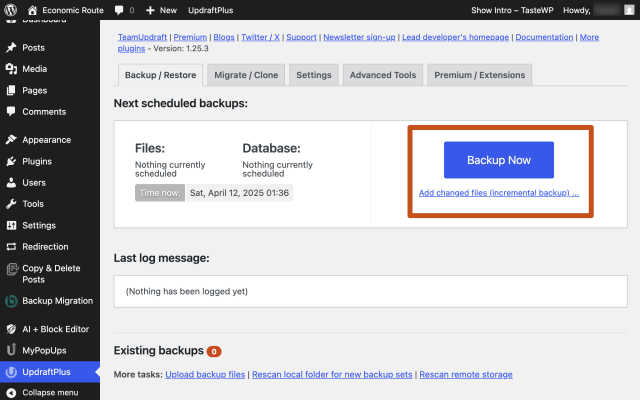
- Create a complete backup of your single site through the UpdraftPlus dashboard.
2. Transfer the backup to your Multisite network using the direct migration feature in UpdraftPlus Premium, which allows you to send the backup directly to your Multisite installation.
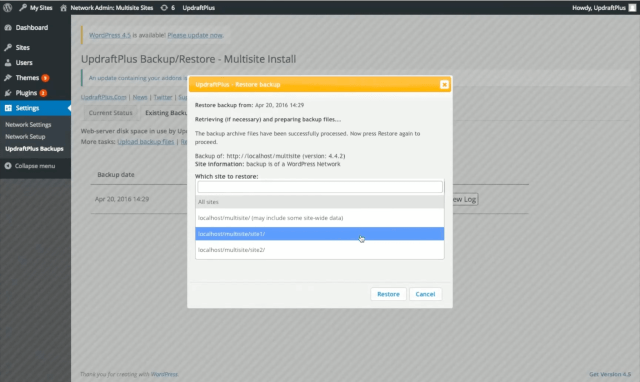
3. Navigate to the UpdraftPlus dashboard in the Network Admin area.
4. Select “Restore” and choose the backup you transferred as normal.
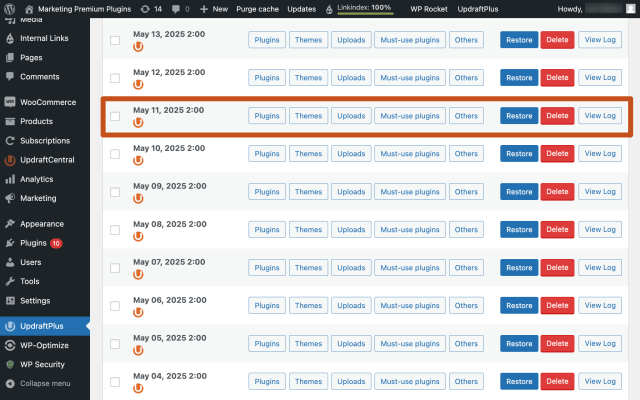
5. After file processing but before restoration begins, select the option to restore the single site as a sub-site in the network.
6. Trigger and complete the restoration process.
7. Your new sub-site will appear in your network’s Sites list.
🚨While UpdraftPlus Premium significantly simplifies the migration process, there are a few things to be aware of:
- These features are considered permanent beta features. Due to the complexity and variety of multisite configurations, the plugin cannot guarantee results in all environments.
- User accounts from a single site will not be automatically transferred to the Multisite network. You’ll need to recreate or map user accounts manually after migration.
- MU-plugins (must-use plugins) and certain other files in the wp-content directory require manual migration, as these are not included in the standard backup and restoration process.
For more information, read our FAQs: How do I restore a single sub-site on a Multisite Network?
Take control of your WordPress Multisite with UpdraftPlus Premium
Section titled Take control of your WordPress Multisite with UpdraftPlus PremiumConverting a single WordPress site into a Multisite network opens up powerful possibilities for managing multiple websites efficiently. However, as we’ve seen, the technical process can be challenging without the right tools.
UpdraftPlus Premium transforms this complex migration into a straightforward journey that even those with limited WordPress development experience can navigate confidently. What would normally require extensive database manipulation and file system changes becomes a guided, mostly automated process.
So, are you ready to simplify your WordPress multisite journey? Try UpdraftPlus Premium today.
About the author

Jelena Janić
Jelena is the Product Manager for UpdraftPlus and WP-Optimize. With seven years of experience, she’s taken on many roles – from tester to developer and now product manager. Along the way, she noticed a disconnect between how products are built and what customers need, sparking a passion for steering products toward solutions that truly serve the people who use them. Today, she ensures every WP-Optimize development decision is geared toward boosting WordPress website performance, enhancing usability, and increasing customer satisfaction.
Categories
UpdraftPlus
Get all our premium features. Direct site-to-site migration, incremental backups, back up automatically before updates and a whole lot more.
From just $70 for the year.
More stories
-

Best Google Analytics alternatives for WordPress
Discover the best Google Analytics alternatives for WordPress, including privacy-friendly tools with simpler dashboards and better performance.
-
Best WordPress themes for artists and creative portfolios
Discover the best WordPress themes for artists to showcase portfolios and display artwork beautifully.
-
Best hosting company for WordPress: Top providers compared
We tested top providers for speed, uptime, support, and pricing to help you choose the right host.
-

What are XSS attacks on WordPress and how to stop them
Learn what a WordPress XSS attack is, how it works, and how to prevent it before it compromises your site.