UpdraftPlus
Back up, restore and migrate your WordPress website with UpdraftPlus
Getting started with UpdraftCentral Cloud is very easy. All it takes is just four steps:

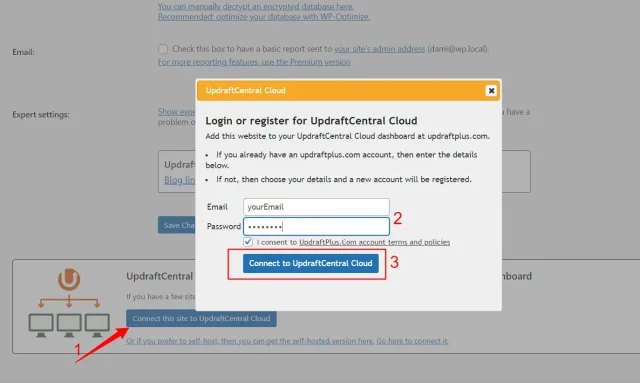
4. On the Settings tab, scroll to the bottom and click the Connect this site to UpdraftCentral button. Fill the popup form with your account details, check the consent box and proceed to connect as shown below.

Once connected, you can now manage this site from your UpdraftCentral dashboard.
To install UpdraftCentral self-hosted on servers you control, follow the guidance shown here:
[updraft_central]Visiting this newly created page will now display your UpdraftCentral dashboard. By default, only an admin user will be able to access this page. If you want to grant other user roles access, use this shortcode instead:
[updraft_central require_role="administrator,editor"]With your dashboard ready, next step is to connect sites to be managed. To do this, start by:

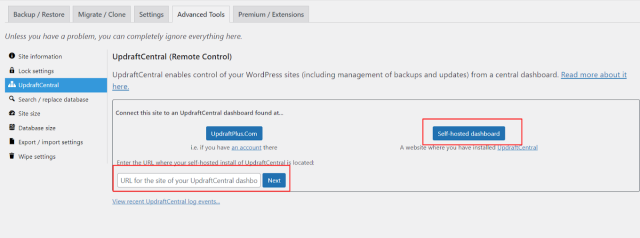
3. In the revealed section, click on the Self-hosted dashboard button and input the URL of your UpdraftCentral dashboard in the provided field as shown above. Click Next, and then Create. Copy the generated key.
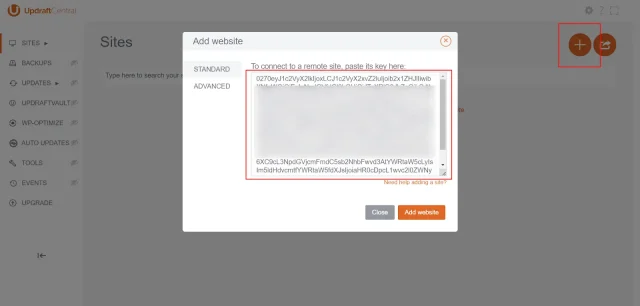
4. Go back to your self-hosted UpdraftCentral dashboard and add a site by clicking the “plus” icon – see image below. Paste the copied key in the field provided by the pop-up box, and finally hit the Add Website button.

5. Repeat these steps for all the websites you want to manage.
Now you can start adding sites to your UpdraftCentral dashboard and manage them from one central location.
For the best experience, upgrade to UpdraftCentral Premium which lets you manage plugins, themes, users, comments and more from your dashboard.
Try TeamUpdraft’s full suite of WordPress plugins.
Back up, restore and migrate your WordPress website with UpdraftPlus
Speed up and optimize your WordPress website. Cache your site, clean the database and compress images
Secure your WordPress website. Comprehensive, feature rich and easy to use
Centrally manage all your WordPress websites’ plugins, updates, backups, users, pages and posts from one location
Privacy-friendly analytics for your WordPress site. Get insights without compromising your visitors’ privacy
