How to clone a WordPress site for testing and staging
Key points:
- WordPress site cloning is essential for testing updates safely and developing new features without risking your live site.
- Two main cloning methods: UpdraftClone (plugin-based, automatic) and manual cloning (technical, but gives complete control).
- UpdraftClone works with both the free and Premium versions of UpdraftPlus, using a simple token system.
- Manual cloning requires advanced WordPress knowledge and is technically demanding, but only requires a developer’s time commitment.
- Choose UpdraftClone for speed and simplicity (especially for temporary testing).
If you manage a WordPress website, you know exactly how risky it can be to make changes directly to your live site. One wrong move can break functionality, disrupt user experience, or even take your site offline completely. That’s where WordPress site cloning can help.
Cloning means creating an exact copy of your WordPress site, which gives you a safe playground for testing updates, redesigning layouts or developing new features without risking your live environment. It’s like a digital sandbox where you can build, break and rebuild without risking your actual website.
In this guide, we’ll explore the most efficient methods for cloning your WordPress site, covering both plugin-based solutions like UpdraftClone and manual techniques for those who prefer complete control.
Let’s help you build a safety net to manage WordPress updates and changes.
But first, in case you are wondering…
Why clone your WordPress site?
Section titled Why clone your WordPress site?Cloning your WordPress site offers several practical benefits for site owners and developers. Rather than making changes directly to your live site, a clone provides a risk-free environment where you can:
- Create a staging environment to safely test plugin updates, theme changes or WordPress core updates before applying them to your production site.
- Work on redesigning your website while keeping your current design active and available to visitors.
- Support development workflows where your team needs separate environments for building and testing new features without disrupting the live site.
- Set up a temporary sandbox for troubleshooting complex issues that are difficult to diagnose on a production site.
- Test changes to WooCommerce stores or membership sites that could impact customer experience if implemented directly on the live site.
Without a proper testing environment, even small changes can lead to unexpected conflicts, broken layouts, or worse. Cloning gives you peace of mind and protects your site’s functionality and user experience.
WordPress site cloning methods
Section titled WordPress site cloning methodsThere are several approaches to cloning WordPress sites, each with different technical requirements:
- Using WordPress staging plugins, like UpdraftClone, to create temporary test sites without server configuration or URL management hassles.
- Manual cloning of database exports, file transfers and URL replacements. This method offers complete control but demands technical expertise and troubleshooting skills.
- Hosting solutions offering built-in staging functionality, which can be easier than manual methods, but may lack the flexibility of dedicated cloning solutions.
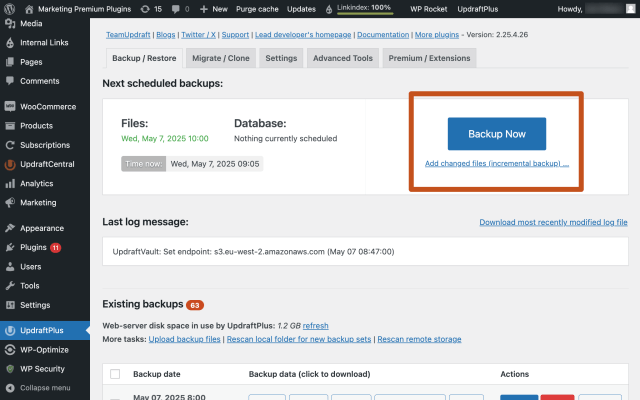
Regardless of your chosen method, always create a complete backup of your live site first to protect against unexpected issues during the cloning process.
Back up before you clone
Cloning can be a powerful tool, but even the safest staging setup carries risks if something goes wrong. With UpdraftPlus Premium, you can schedule automatic backups and store them in multiple locations, so you always have a fallback before making changes.
Let’s now explore each method in detail.
1. Using a staging plugin like UpdraftClone to create a clone or test site instantly
Section titled 1. Using a staging plugin like UpdraftClone to create a clone or test site instantlyUpdraftClone offers the most efficient path to creating WordPress staging environments without the technical headaches of manual cloning. Working directly within the free and Premium version of UpdraftPlus, it creates instant cloud-based WordPress test environments with minimal effort.
Some of the best features of the plugin are:
- UpdraftClone eliminates the need to configure servers, set up separate hosting, or manually migrate databases.
- Each clone operates on its own secure environment with encrypted data transmission and storage.
- You can extend your clone’s lifespan by adding more tokens when needed, giving you flexible testing timeframes for thorough development work.
- It automatically handles WordPress cloning’s most challenging aspect – updating all internal URL references. This automatic URL reference updating eliminates a common source of errors when duplicating sites and ensures your clone works perfectly from the start.
- For developers working with multiple client sites, UpdraftClone also offers the ability to create empty WordPress installations for testing themes or plugins without affecting existing site content.
- The plugin has detailed documentation that helps you easily navigate the process.
Think of UpdraftClone as your development safety net. It removes the anxiety that typically accompanies major site changes, giving you the confidence that you can experiment without consequences.
This psychological freedom transforms how you approach redesigns, plugin updates and code modifications, often leading to more creative solutions that might otherwise seem too risky to attempt.
As one of our happy users puts it:
“As a web designer, it’s very useful to make clones for testing purposes and to migrate my developing environment to live sites. Thank you for developing and maintaining such a great tool.”
One-click cloning with UpdraftClone
Why spend hours uploading files and tweaking databases when you can clone your site in minutes? UpdraftClone handles everything -from URL updates to secure hosting so you can focus on testing, not troubleshooting.
Clone your site: step-by-step
Section titled Clone your site: step-by-stepUpdraftClone operates on a straightforward token system. For standard WordPress sites up to 25GB, you’ll need just one token to create the clone and one additional token for each week it remains active (meaning you can retain permanent staging sites).
Larger sites require more tokens based on size: up to 50GB uses two tokens, up to 80GB uses four tokens and up to 160GB uses eight tokens. These tokens never expire and remain in your account until used.
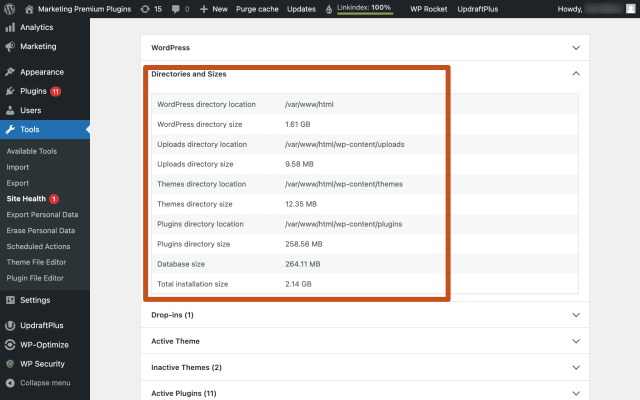
To find out the size of your WordPress site:
- Go to your WordPress admin area.
- In the left-side menu, navigate to “Tools > Site Health > Info”.
- Choose “Directories and Sizes”.
- Look for the WordPress directory size to find the total size of your site.
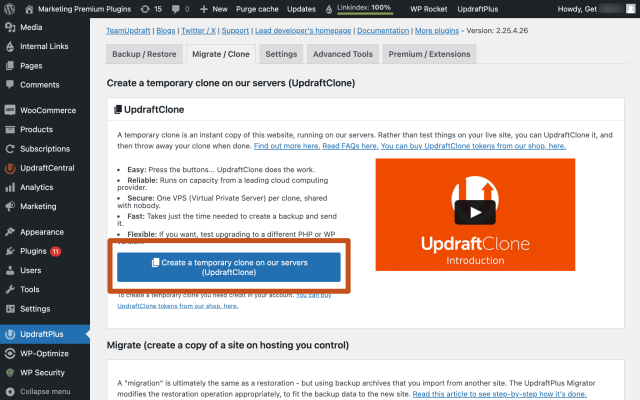
Creating a clone with UpdraftClone is straightforward:
- In your WordPress dashboard, navigate to the UpdraftPlus “Clone/Migrate” option.
- Click the Create a temporary clone on our servers (UpdraftClone) button.
3. Enter your TeamUpdraft Email and Password or clone key.
4. Select the PHP and WordPress versions you want the clone to use.
5. Choose the nearest clone region to your location.
6. Select your clone type and clone package.
7. Click “Create Clone”.
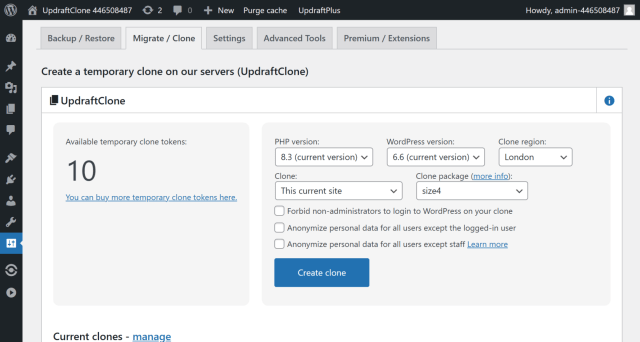
8. Access your temporary clone through the provided URL via email.
And that’s it! That covers the easiest way to clone your WordPress site. Now, let’s look at how you can do this manually.
2. Manual WordPress cloning without plugins
Section titled 2. Manual WordPress cloning without pluginsWhile plugin-based solutions offer ultimate convenience, some users prefer the control and flexibility of manual cloning. This approach requires more technical knowledge but gives you complete oversight of the process.
a. Back up your website
Before starting the manual cloning process, create a full backup using UpdraftPlus. Having a backup allows for easy recovery if anything goes wrong during the manual process.
b. Download all WordPress files
- Connect to your website using an SFTP client like FileZilla and enter your SFTP credentials (hostname, username and password) provided by your hosting provider.
- Navigate to your WordPress root directory (usually public_html or www).
- Download and save all your WordPress files and folders (wp-admin, wp-includes, wp-content and all files in the root directory, including .htaccess and wp-config.php). You can even save the files on your Google Drive for extra reassurance.
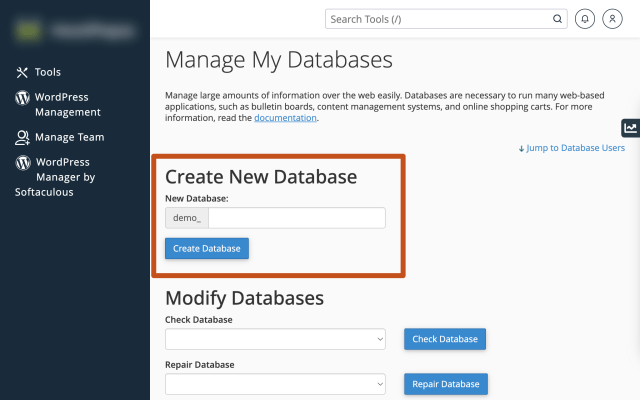
c. Export the WordPress database
- Log in to your hosting control panel and navigate to phpMyAdmin in the Databases section.
- Select your WordPress database from the left sidebar.
- Click on the “Export” tab at the top of the page.
- Choose the “Quick” export method and “SQL” format.
- Click “Go” to download the database file to your computer.
d. Set up the new environment
Whether you’re creating a clone on the same server (as a subdomain for testing/staging purposes) or on a new server (for migrating your site entirely), you’ll need to prepare the environment.
- Create a new domain or subdomain by logging into your hosting control panel and navigating to the “Domains” or “Subdomains” section. Keep a note of the directory path where the files will be stored!
- In your hosting control panel, go to the “Databases section,” and create a new database with a secure password. Take note of the database name, username, password and host (usually “localhost”).
e. Upload the files and database to your new site
- Connect to your new site location using SFTP.
- Navigate to the root directory of the new site (public_html or the specific subdomain folder).
- Upload all the WordPress files and folders you downloaded earlier. Ensure all files transfer correctly, maintaining the original directory structure.
- Access phpMyAdmin for your new site and select the newly created database from the left sidebar.
- Click on the “Import” tab.
- Click “Choose File” and select the SQL file you exported earlier, then click Go to begin the import process.
f. Configure the cloned site
- Using your SFTP, locate and download the wp-config.php file from your new site
- Open it with a text editor (like Notepad++ or Visual Studio Code) and update the following database details to match your new database:
define('DB_NAME', 'new_database_name_here');
define('DB_USER', 'new_username_here');
define('DB_PASSWORD', 'new_password_here');
define('DB_HOST', 'localhost'); // Usually this stays the same
3. Save the file and upload it back to your new site, replacing the old wp-config.php file.
4. (Updating the site URLs in the database is necessary if your cloned site will have a different URL than the original). In phpMyAdmin, select your new database and click on the “SQL” tab.
5. Execute the following SQL queries, replacing ‘oldwebsiteurl’ with your original site URL (e.g., https://olddomain.com) and ‘newwebsiteurl’ with your new site URL (e.g., https://newdomain.com):
UPDATE wp_options SET option_value = REPLACE(option_value, 'oldwebsiteurl', 'newwebsiteurl');
UPDATE wp_posts SET guid = REPLACE(guid, 'oldwebsiteurl', 'newwebsiteurl');
UPDATE wp_posts SET post_content = REPLACE(post_content, 'oldwebsiteurl', 'newwebsiteurl');
UPDATE wp_postmeta SET meta_value = REPLACE(meta_value, 'oldwebsiteurl', 'newwebsiteurl');6. (Optional) If you’re having issues with redirects, add these lines to your wp-config.php file, just before the line that says:
That's all, stop editing! Happy publishing:
define('WP_HOME', 'http://newdomain.com');
define('WP_SITEURL', 'http://newdomain.com');
Replace ‘newdomain.com’ with your actual new domain name.
g. Test your cloned website
Visit your new WordPress site in a browser and try to log in to the WordPress admin area using the same credentials as your original site. Check if images, links and other content display correctly. Test navigation and functionality to ensure everything works as expected.
Also, if you’re moving to a new domain, remember that you’ll need to update DNS settings to point to your new host’s nameservers from your domain registrar. This process can take 24-48 hours to propagate fully.
Getting started with UpdraftClone: Create your WordPress test environment today
Section titled Getting started with UpdraftClone: Create your WordPress test environment todayConsider the real costs of not having a proper staging solution: the midnight emergencies when a plugin update crashes your site, the frustrated clients when their ecommerce store suddenly stops processing orders or the lost revenue during unexpected downtime.
Don’t let the fear of breaking your live site hold back your WordPress development, though. While we’ve explored the laborious manual cloning methods, the choice is clear: UpdraftClone.
With UpdraftClone, you’re investing in peace of mind. What once required hours of technical configuration now takes just minutes, freeing you to focus on creativity and innovation rather than worrying about technical failures.
So, take the next step today. Get UpdraftClone to free yourself from site-breaking anxiety and arm yourself with a bulletproof testing process.
About the author

Jelena Janić
Jelena is the Product Manager for UpdraftPlus and WP-Optimize. With seven years of experience, she’s taken on many roles – from tester to developer and now product manager. Along the way, she noticed a disconnect between how products are built and what customers need, sparking a passion for steering products toward solutions that truly serve the people who use them. Today, she ensures every WP-Optimize development decision is geared toward boosting WordPress website performance, enhancing usability, and increasing customer satisfaction.
Categories
UpdraftPlus
Get all our premium features. Direct site-to-site migration, incremental backups, back up automatically before updates and a whole lot more.
From just $70 for the year.
More stories
-

10 best WordPress themes for beauty salons
Here are the best options to help you stand out, look professional, and turn visitors into bookings.
-
Best Google Analytics alternatives for WordPress
Discover the best Google Analytics alternatives for WordPress, including privacy-friendly tools with simpler dashboards and better performance.
-
Best WordPress themes for artists and creative portfolios
Discover the best WordPress themes for artists to showcase portfolios and display artwork beautifully.
-
Best hosting company for WordPress: Top providers compared
We tested top providers for speed, uptime, support, and pricing to help you choose the right host.