How to delete a database in phpMyAdmin (safely and correctly)
Accidentally nuking a WordPress database is one of those mistakes that keeps site owners up at night. You might be cleaning up old test installs, migrating to a new host, or troubleshooting a broken site. Whatever the reason, you searched for phpmyadmin delete database, and you want to do it safely, with zero surprises. This guide explains the safest path, why some hosts don’t let you drop a database in phpMyAdmin at all, and exactly what to do instead. We’ll also show the difference between deleting a database, dropping tables, and simply emptying data, so you pick the right action for your goal.
Before you start, always take a full WordPress backup. Database deletions are permanent, and a recent backup is your only safety net if something goes wrong.
Key takeaways
Section titled Key takeaways- If phpMyAdmin shows “Remove database (DROP)”, you have sufficient privileges and you can drop the DB.
- If you can’t do this, your hosts may be preventing you from dropping a database in phpMyAdmin; in this case, use the hosting control panel instead
- Deleting a database is different from dropping tables or emptying data; make sure you choose the right action
- UpdraftPlus gives you a clean rollback plan if anything goes wrong during cleanup
What deleting a database actually does
Section titled What deleting a database actually does- Deleting the database removes the entire schema, every table, and every row
- Drop tables deletes selected tables, but keeps the database container
- Empty data (truncate) clears rows but keeps the table structure
- Export, then delete, lets you archive a snapshot before removing anything
phpMyAdmin supports dropping databases, tables, and rows. However, your account needs the right privileges. Some hosts intentionally disable database deletion in phpMyAdmin to avoid catastrophic clicks. phpMyAdmin’s own docs list “drop” as a supported feature, but hosts may override it with configuration or permission policies.
Back up before you delete
One wrong click in phpMyAdmin can wipe your entire site. UpdraftPlus Premium gives you reliable, automated backups stored offsite – plus included UpdraftClone tokens so you can test changes safely.
How to delete a database in phpmyadmin
Section titled How to delete a database in phpmyadminIf you have sufficient privileges, you can remove your Database by following these step-by-step instructions.
Preparation
Section titled Preparation- Go to UpdraftPlus and back up your site with a full backup that includes the database and files, ideally stored offsite
- Note the database name from
wp-config.php (DB_NAME), so you don’t delete the wrong one (you may want to make a copy of your wp-config for future reference) - Confirm you’re on the right server and the right hosting account
- Export the database in phpMyAdmin as an extra safety net
Steps to delete a database in phpMyAdmin
Section titled Steps to delete a database in phpMyAdmin- Log in to phpMyAdmin from your hosting dashboard
- In the left sidebar, select the database you want to remove
- Click the Operations tab
- Scroll to Remove database and click Drop the database (DROP)
- Confirm deletion
No option to drop the database?
Section titled No option to drop the database?If you don’t see the Remove database (DROP), your host has probably disabled it or your MySQL user lacks privileges. In that case, use your control panel’s database tool instead. See the host-specific instructions below
Why do some hosts hide or disable database deletion in phpMyAdmin?
Section titled Why do some hosts hide or disable database deletion in phpMyAdmin?Shared and managed hosts often centralize “create” and “delete actions” in the hosting panel. This reduces accidental data loss, keeps naming consistent, and ensures user permissions update correctly. Here are some approaches adopted my popular hosting providers
- DreamHost states that dropping or deleting a database must be done in the DreamHost panel, not in phpMyAdmin.
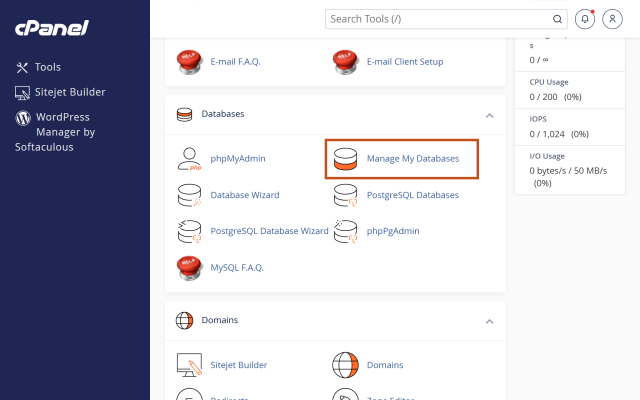
- cPanel-based hosts commonly direct you to the MySQL Databases tool for database deletion, while phpMyAdmin is for viewing and editing content. cPanel’s docs cover deletion in the panel.
- Hostinger hPanel shows deletion from the List of Current MySQL Databases actions menu. Their phpMyAdmin articles focus on dropping tables, not entire databases.
- Hosting.com knowledge base explicitly says you cannot delete an entire database in phpMyAdmin on their managed plans and must use cPanel instead.
How to delete a database when phpMyAdmin won’t allow it
Section titled How to delete a database when phpMyAdmin won’t allow itDelete database using cPanel
Section titled Delete database using cPanel- Open cPanel
- Go to MySQL Databases
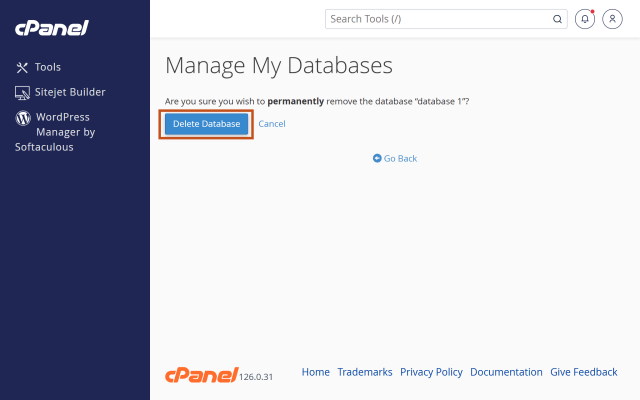
3. Find your database in the list and choose Delete
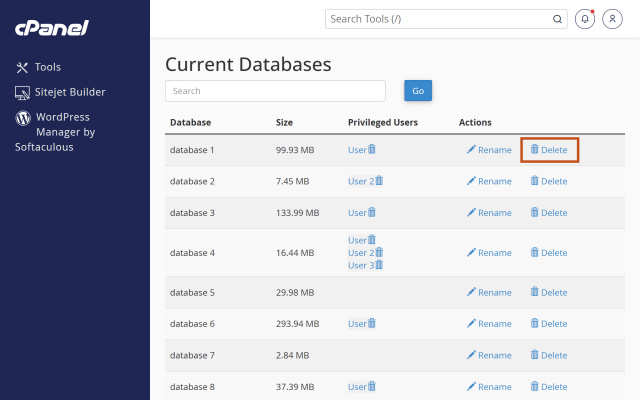
4. Confirm and remove any orphaned users if prompted
Delete database using Hostinger hPanel
Section titled Delete database using Hostinger hPanel- Log in to hPanel
- Open MySQL Databases
In List of Current MySQL - Databases and Users, click the three dots for your database
- Choose Delete and confirm
Delete database using DreamHost Panel
Section titled Delete database using DreamHost Panel- Log in to the DreamHost panel
- Open MySQL Databases
- Click Delete DB next to the database
- Optionally restore from the MySQL Recycle Bin within 30 days
Do you really want to delete the entire database?
Section titled Do you really want to delete the entire database?Before dropping a whole database in phpMyAdmin, confirm your actual goal. In many cases, deleting the entire database isn’t necessary. Here are some common scenarios and safer alternatives:
- Retiring a test site
Delete the database from your hosting control panel, then remove its user and credentials. - Cleaning junk data
Drop specific tables inside phpMyAdmin or truncate rows, while keeping the database container. - Preparing for a clean import
Export a backup, drop all tables, then import a fresh dump into the same database. - Migrating hosts
Keep the old database active until the new site has been running smoothly for a few days, then delete the old one.
How to confirm you have the right database
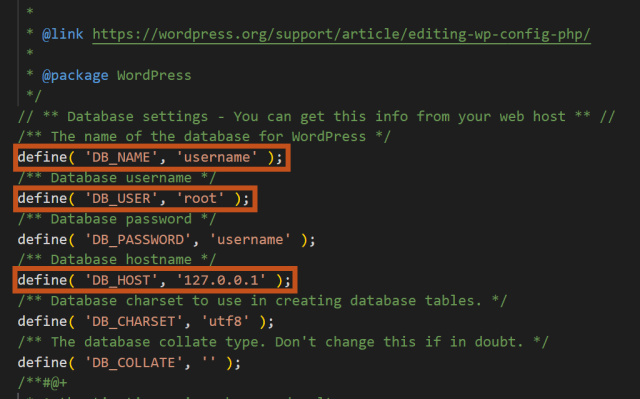
Section titled How to confirm you have the right database- Open
wp-config.phpin the root of your WordPress site - Check these constants:
DB_NAME, DB_USER, DB_HOST - In phpMyAdmin or your panel, make sure the database you plan to delete matches
DB_NAME - If you have multiple WordPress installs on one account, repeat the check for each site to avoid deleting a shared database
wp config.png
Safe cleanup workflow with backup and rollback
Section titled Safe cleanup workflow with backup and rollback- Back up your site and database with UpdraftPlus
- Export the database from phpMyAdmin as an extra copy
- Delete the database using the recommended method for your host
- Remove old credentials from wp-config.php or archive the file
- Verify that your active site points to the correct database
- Keep backups for at least a few days before permanently discarding them
Troubleshooting common issues in phpMyAdmin
Section titled Troubleshooting common issues in phpMyAdmin“Remove database” option is missing
Section titled “Remove database” option is missingIf you don’t see the Remove database (DROP) option in phpMyAdmin, your host may have disabled it or your MySQL user doesn’t have the required privileges. Use your hosting control panel’s database tool instead.
Deletion fails with permission errors
Section titled Deletion fails with permission errorsThis usually means you’re trying to delete a database from phpMyAdmin without the correct privileges. Switch to your hosting control panel (e.g., cPanel, hPanel, DreamHost panel) to complete the action.
Enabling DROP in self-hosted phpMyAdmin
Section titled Enabling DROP in self-hosted phpMyAdminOn your own server, admins can toggle $cfg['AllowUserDropDatabase'] to allow database deletion. Shared hosts usually keep this setting disabled for safety. Only change this if you know exactly what you’re doing.
Need a reversible option
Section titled Need a reversible optionSome hosts (like DreamHost) offer a recycle bin for databases deleted via their panel. Even so, always create your own backups before making permanent changes.
If you are tinkering with your database, a fresh backup is non-negotiable. One wrong click in phpMyAdmin can wipe your site. A backup turns a disaster into a quick restore.
Conclusion
Section titled ConclusionDeleting a database in phpMyAdmin is powerful and irreversible. Before you click DROP, double-check that you’re targeting the right database, confirm your goal, and always have a recent backup ready. If phpMyAdmin doesn’t allow database deletion, use your hosting control panel instead. With careful preparation and a solid rollback plan, you can clean up or reset your site without the risk of permanent data loss.
Your safety net for database changes
Whether you’re deleting a test database, dropping tables, or cleaning up your site, UpdraftPlus Premium ensures you can roll back in minutes if anything goes wrong.
FAQs
Section titled FAQsCan I delete a database in phpMyAdmin on every host?
No. Many hosts restrict this. Use the hosting control panel’s database tool when the Remove database (DROP) is missing in phpMyAdmin.
Is dropping all tables the same as deleting the database?
Dropping tables empties the database but keeps the database container. Deleting the database removes the container, too.
What happens to my site after I delete its database?
WordPress will show database connection errors. If you plan to rebuild or migrate, update wp-config.php to point to a valid database
How do I undo a deletion?
If your host has a recycle bin, you may be able to restore. Otherwise, use your backup to recreate the database and import the data. DreamHost documents a 30-day recycle bin for databases.
About the author

Ivan Đukić
Ivan is the Product Manager for UpdraftPlus. With a background as a full-stack developer, he’s spent years building custom features, plugins, and tools. Often working side by side with product and marketing teams to bring ideas to life. Comfortable across the full lifecycle, from shaping concepts to QA and support, he found product management to be a natural next step. Today, Ivan focuses on turning complex needs into reliable, user-friendly solutions that help WordPress site owners protect and manage their websites with confidence.
Categories
UpdraftPlus
Get all our premium features. Direct site-to-site migration, incremental backups, back up automatically before updates and a whole lot more.
From just $70 for the year.
More stories
-

Best Google Analytics alternatives for WordPress
Discover the best Google Analytics alternatives for WordPress, including privacy-friendly tools with simpler dashboards and better performance.
-
Best WordPress themes for artists and creative portfolios
Discover the best WordPress themes for artists to showcase portfolios and display artwork beautifully.
-
Best hosting company for WordPress: Top providers compared
We tested top providers for speed, uptime, support, and pricing to help you choose the right host.
-

What are XSS attacks on WordPress and how to stop them
Learn what a WordPress XSS attack is, how it works, and how to prevent it before it compromises your site.