How to safely change a WordPress theme
Changing your WordPress theme is a quick way to give your website a fresh look, but it’s worth preparing before you make the switch. Your posts, pages and media won’t disappear when you change themes, but elements such as menus, widgets, layouts and theme-specific settings can be affected.
In this guide, we’ll show you how to safely change your WordPress theme while minimising the risk of problems. You’ll learn how to back up your site, test your new theme in a staging environment and check everything is working properly before and after making the change live.
Key takeaways
Section titled Key takeaways- Changing your WordPress theme affects your site’s design and layout, but it won’t delete your posts, pages or media.
- Always create a complete backup before changing themes so you can restore your site if anything goes wrong.
- Test your new theme on a staging site first whenever possible, so you can identify and fix issues without affecting your live website.
- Make a note of your menus, widgets, custom code and theme-specific settings before switching, as some may need to be reconfigured.
- Before switching themes on your live site, check important pages, menus, forms and mobile layouts in your staging environment.
What happens when you change your WordPress theme?
Section titled What happens when you change your WordPress theme?One of the biggest concerns when changing a WordPress theme is whether you’ll lose your content. Fortunately, WordPress keeps your content separate from your theme. This means switching themes changes how your website looks and is laid out, rather than removing your posts, pages or media.
What happens to your content?
Section titled What happens to your content?Your posts, pages, images and other media will remain in WordPress when you change your theme. Your users, comments and most WordPress settings will also stay in place.
Your plugins will remain installed and active too. Plugins you use for SEO, contact forms, backups or ecommerce should generally continue to work, although you may notice changes to their appearance or, in some cases, compatibility issues with your new theme. This is one reason it’s important to test your site before making the switch.
What happens to your design, menus and widgets?
Section titled What happens to your design, menus and widgets?Your website’s appearance can change significantly when you switch themes. Themes have their own layouts, styling, menu locations and widget areas, so some elements may need to be reconfigured.
Your menus won’t be deleted, but you may need to assign them to the appropriate locations supported by your new theme. Widgets can also be affected if the new theme uses different widget areas, so check your sidebars, footer and other widget locations after switching.
How to prepare before changing your WordPress theme
Section titled How to prepare before changing your WordPress themeA little preparation can make changing your WordPress theme much easier. Before you start, take some time to back up your site and record anything you may need to recreate or reconfigure with your new theme.
Step 1. Create a complete backup
Section titled Step 1. Create a complete backupBefore changing your theme, create a complete backup of your WordPress site. If the new theme causes unexpected problems or you need to return to your previous setup, having a recent backup gives you a reliable way to restore your site.
Make sure your backup includes both your WordPress files and database. Together, these contain the content, settings, plugins, themes, uploads and other data needed to restore your website.
You can back up WordPress manually, but using a backup plugin such as UpdraftPlus makes the process much easier. It can back up your files and database and store copies remotely, so you have a recent backup available if you need to restore your site.
Back up before you switch themes
Changing your WordPress theme doesn’t always go to plan. With UpdraftPlus, you can back up your files and database before making changes, giving you a reliable way to restore your site if you need to roll back.
Step 2. Save any custom code and tracking scripts
Section titled Step 2. Save any custom code and tracking scriptsBefore changing themes, check whether you’ve added any custom code or tracking scripts through your current theme. This might include Google Analytics or other tracking scripts, custom CSS or PHP snippets used to add extra functionality.
Code added directly to your current theme or its theme-specific settings may not carry over when you switch. Save a copy of anything you want to keep so you can add it back safely if needed.
This is also a good opportunity to move important tracking scripts and customisations away from your theme where possible. Using a dedicated plugin, Google Tag Manager or a child theme can help keep them separate from your site’s design, making future theme changes easier.
Step 3. Document your current menus, widgets and layout
Section titled Step 3. Document your current menus, widgets and layoutBefore switching themes, take a few screenshots of important areas of your website, such as your homepage, blog, navigation menus, sidebars and footer. These give you a useful reference if you need to recreate parts of your layout with the new theme.
It’s also worth reviewing your current menus and widgets and making a note of where they’re displayed. Your content won’t be deleted when you switch themes, but your new theme may use different menu locations and widget areas, so some elements may need to be reassigned or reconfigured afterwards.
How to safely change your WordPress theme using a staging site
Section titled How to safely change your WordPress theme using a staging siteWhere possible, test your new WordPress theme on a staging site before activating it on your live website. A staging site gives you a separate environment where you can install the theme, configure its settings and check for problems without disrupting your visitors.
Many WordPress hosting providers include staging tools that let you create a copy of your website from your hosting control panel. The exact process varies between providers, so check your host’s documentation for instructions.
If your hosting plan doesn’t include staging, another option is UpdraftClone. It lets you create a temporary copy of your WordPress site that you can use to test your new theme and other changes without affecting your live website.
Once your staging or cloned site is ready, you can install and configure your new theme, check your layouts and test important functionality before making the same changes on your live site.
How to test a new WordPress theme with UpdraftClone
Section titled How to test a new WordPress theme with UpdraftCloneIf your hosting provider doesn’t include staging, UpdraftClone offers another way to test your new theme without affecting your live website. UpdraftClone creates a temporary copy of your WordPress site on our servers, giving you a separate environment where you can install, configure and test your new theme.
UpdraftClone uses clone tokens to create and run temporary cloned sites. You can purchase tokens separately, while UpdraftPlus Premium plans include a number of tokens depending on your licence.
Once your clone is ready, you can install your new theme, adjust its settings and check that your site’s design and functionality work as expected before making the changes on your live website.
How to create a cloned site with UpdraftClone
Section titled How to create a cloned site with UpdraftClone- If you haven’t already, install and activate UpdraftPlus. In your WordPress dashboard, go to Plugins > Add New Plugin, search for UpdraftPlus, then select Install Now followed by Activate.
- Open your UpdraftPlus settings and select the Migrate / Clone tab.
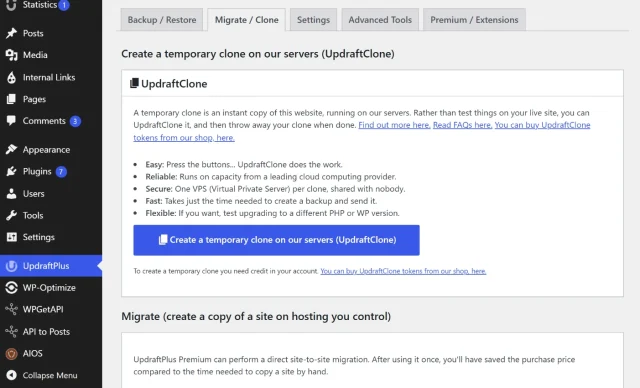
- Check that you have enough clone tokens available, then follow the prompts to create your cloned site.
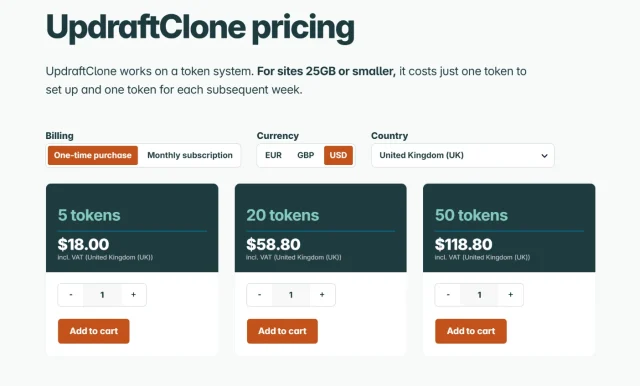
- Clone tokens act as hosting credits for your temporary cloned site.
- Choose the server region and other available settings for your clone, then select Create clone.
- UpdraftClone will create a copy of your site and provide a temporary URL where you can access and test it without affecting your live website.
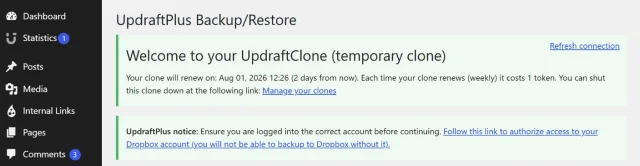
- Once your clone is ready, you’ll receive an email with the details you need to access your temporary site.
Test your new theme on the cloned site
Section titled Test your new theme on the cloned siteLog in to your cloned WordPress site using the details provided. Because this is separate from your live website, you can install and configure your new theme without affecting the site your visitors are using.
Once you’ve activated the new theme on your clone, work through the areas most likely to be affected by the change:
- Check important pages, including your homepage, blog, contact page and any key landing pages.
- Review your navigation menus, sidebars, footer and widget areas and reassign anything that has moved.
- Test forms, buttons, search, ecommerce features and other important functionality.
- Check your site on different screen sizes to make sure the new theme works well on mobile and desktop.
- Review any custom CSS, tracking scripts or other theme-specific customisations you identified earlier.
Once you’re happy with how the new theme looks and functions, make a note of any settings or changes you’ll need to reproduce when you switch themes on your live website.
How to install and activate your new WordPress theme
Section titled How to install and activate your new WordPress themeOnce you’ve created a backup and, ideally, set up a staging or cloned version of your site, you’re ready to install your new WordPress theme.
The installation process depends on where you got your theme. Free themes from the WordPress Theme Directory can be installed directly from your dashboard, while premium or third-party themes are usually provided as a ZIP file that you’ll need to upload.
Method 1. Install a theme from the WordPress Theme Directory
Section titled Method 1. Install a theme from the WordPress Theme DirectoryIf you’re using a free theme from the official WordPress Theme Directory, you can find and install it without leaving your WordPress dashboard.
- From your WordPress dashboard, go to Appearance > Themes, then select Add New Theme.
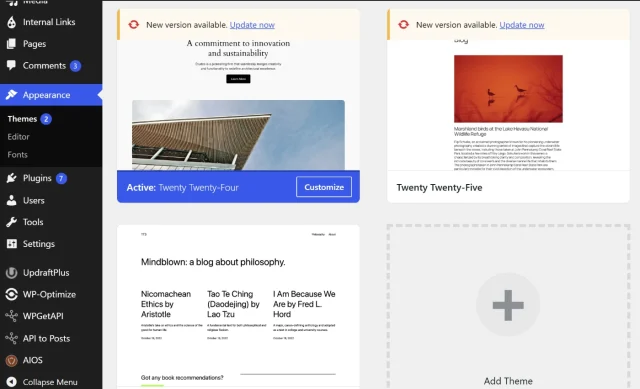
- Search for the theme you want to use by name, or use the available filters to browse themes based on features, layout and purpose.
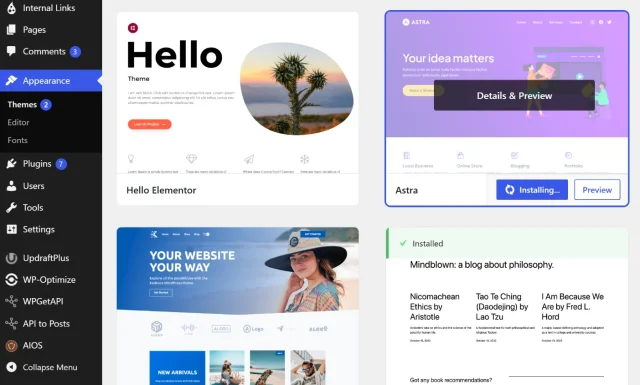
- When you’ve found the theme you want to test, select Install. If you’re following this process on a staging or cloned site, you can then activate the theme there and begin testing it.
Method 2. Upload a WordPress theme as a ZIP file
Section titled Method 2. Upload a WordPress theme as a ZIP fileIf you’ve purchased a premium theme or downloaded one from a third-party provider, you’ll usually receive it as a ZIP file. You can upload this directly through your WordPress dashboard.
- Go to Appearance > Themes > Add New Theme.
- Select Upload Theme at the top of the page.
- Choose the theme’s ZIP file from your computer and select Install Now.
- Once the installation is complete, activate the theme on your staging or cloned site so you can begin testing it.
Alternative: Install your theme using SFTP or FTP
Section titled Alternative: Install your theme using SFTP or FTPIf you can’t upload the theme through your WordPress dashboard, you can install it manually using SFTP or FTP. SFTP is preferable where your hosting provider supports it because the connection is encrypted.
- Connect to your server using an SFTP or FTP client and the credentials provided by your hosting provider.
- On your computer, extract the theme’s ZIP file.
- Navigate to the /wp-content/themes/ directory on your server.
- Upload the extracted theme folder to this directory and wait for the transfer to finish.
- Return to Appearance > Themes in your WordPress dashboard. Your new theme should now appear alongside your other installed themes.
Test your new theme and fix any issues
Section titled Test your new theme and fix any issuesOnce you’ve activated your new theme on your staging or cloned site, take some time to check how everything looks and works. Work through your website systematically, paying particular attention to your navigation, important pages, forms, sidebars, footer and other areas that may be affected by the change.
Check and reassign your menus
Section titled Check and reassign your menusYour existing menus should remain in WordPress after you change themes, but you may need to assign them to the locations supported by your new theme.
If you’re using a classic theme, check your menu settings under Appearance and make sure the correct menu is assigned to locations such as your primary navigation or footer.
If you’re using a block theme, navigation is usually managed through the Site Editor. Open your header or navigation area and check that the correct menu and links are displayed.
Once you’ve made any changes, check your site from the front end and test your navigation links to make sure they work as expected.
Check for broken shortcodes and page builder layouts
Section titled Check for broken shortcodes and page builder layoutsSome themes include their own shortcodes, blocks or other functionality for creating elements such as buttons, columns and sliders. If your old theme provided these features, switching themes can leave unsupported shortcodes or missing elements behind.
Review your most important pages and look for broken layouts, missing content or shortcode text that is being displayed instead of the intended element. You may need to edit affected pages and replace theme-specific features with WordPress blocks or alternatives supported by your new theme.
If you use a page builder such as Elementor or Divi, review those pages carefully too. Your content may remain in place, but differences in your new theme’s templates, styling and content widths can affect how pages are displayed.
Check your widgets, sidebars and footer
Section titled Check your widgets, sidebars and footerYour new theme may provide different widget areas or handle elements such as sidebars and footers differently from your previous theme.
For classic themes, check your widget areas under Appearance > Widgets and reassign or reconfigure any widgets that are no longer displayed where you expect them.
If you’re using a block theme, check these areas through the Site Editor instead. Review your header, footer and other template areas to make sure the correct blocks and content are in place.
Use the screenshots and notes you made before switching themes as a reference, but don’t feel you need to recreate the old design exactly. This is also a good opportunity to remove anything you no longer need and make the most of your new theme’s layout.
Go live and run your final checks
Section titled Go live and run your final checksOnce you’re happy with your new theme on your staging or cloned site, you’re ready to make the change on your live website.
How you do this depends on the staging setup you’ve used. Some hosting providers include tools for pushing staging changes to your live site, although the exact process and options vary between hosts. If you’ve used a temporary cloned site for testing, such as UpdraftClone, you can use what you’ve learned during testing to configure the new theme on your live website.
Before making any changes to your live site, create another up-to-date backup. This gives you a recent restore point in case anything behaves differently when you make the switch.
Once the new theme is active, repeat your key checks on the live site. Test important pages, navigation, forms and other functionality to make sure everything is working as expected.
Test your site’s speed and performance
Section titled Test your site’s speed and performanceChanging your WordPress theme can affect performance because themes differ in how they handle CSS, JavaScript, fonts, images and other resources. Once your new theme is live, test your site’s performance to see whether anything has changed.
Check your most important pages using a performance testing tool such as PageSpeed Insights, paying attention to both mobile and desktop results and your Core Web Vitals. If performance has dropped, look for issues such as large or unoptimised images, unnecessary scripts, excessive requests or caching problems.
A WordPress optimisation plugin such as WP-Optimize can also help you improve performance by caching pages, compressing images and cleaning unnecessary data from your database.
Keep your new theme running smoothly
Your new theme can change how your site performs. WP-Optimize helps keep WordPress running efficiently with page caching, image optimisation and database cleaning tools.
Check your site on mobile devices
Section titled Check your site on mobile devicesYour new theme may behave differently across screen sizes, so check how your site looks and works on both mobile and desktop devices. If possible, test it on a real smartphone as well as using your browser’s responsive testing tools.
Browse your site as a visitor would. Open and close the navigation menu, scroll through important pages and blog posts, tap buttons and links and test forms or other interactive features.
Look for text that’s difficult to read, images that don’t resize correctly, overlapping elements, awkward spacing or buttons that are difficult to tap. It’s also worth checking key pages at several screen sizes to make sure your new theme provides a consistent experience across different devices.
Conclusion
Section titled ConclusionChanging your WordPress theme doesn’t have to be risky. The key is to prepare before you make the switch: back up your site, test the new theme in a staging environment and check your design and functionality carefully before and after going live.
Taking these precautions gives you the freedom to try a new look without putting your existing site at unnecessary risk. UpdraftPlus can help you create a reliable backup before you start, while UpdraftClone gives you a separate environment where you can test your new theme without affecting your live website.
FAQs
Section titled FAQsWill changing my WordPress theme delete my posts or pages?
No. Your posts, pages, images and other content are stored separately from your WordPress theme, so changing themes won’t delete them. However, your site’s layout and the way your content is displayed may change.
Do I need to put my WordPress site in maintenance mode when changing themes?
Not if you test the new theme on a staging or cloned site first. If you need to configure the theme directly on your live website, maintenance mode can prevent visitors from seeing unfinished layouts while you make your changes. Keep any downtime as short as possible.
Why does my homepage look different after changing WordPress themes?
Different themes use different templates, layouts and settings, so your homepage may look different after switching. Check that the correct page is set as your homepage and review your new theme’s templates, navigation, blocks and other settings. Avoid importing demo content unless you actually need it, as this can add unnecessary pages, posts or media to an existing site.
What happens to my plugins when I switch WordPress themes?
Your plugins will remain installed and active when you change themes. Most should continue working, but their appearance or functionality can sometimes be affected by compatibility with your new theme. Test important features such as forms, ecommerce functionality and page builders before and after switching.
Can I switch back to my old WordPress theme?
Yes, provided your previous theme is still installed, you can reactivate it from Appearance > Themes. However, switching back may not automatically restore every theme-specific setting, widget, menu location or customisation exactly as it was. Keeping a complete backup from before the change gives you a more reliable way to restore your previous site if necessary.
About the author

Elvira Mishra
Elvira has over four years of experience creating and designing content in WordPress. Her background spans multiple digital disciplines, including marketing, SEO, user experience, and human computer interaction.
Categories
UpdraftPlus
Get all our premium features. Direct site-to-site migration, incremental backups, back up automatically before updates and a whole lot more.
From just $70 for the year.
More stories
-

5 WordPress Web Design Tips to Improve Your Website
Good web design is about more than appearance. Explore practical WordPress web design tips to improve your website's layout, navigation, mobile responsiveness, accessibility and performance, helping you create a better experience for your visitors.
-
Best AI Website Builders Compared
AI website builders can help you design, write and launch a website in minutes. Compare the best AI-powered website builders based on ease of use, features, customisation, pricing and performance to find the right solution for your next project.
-

How incremental backups save time and storage in WordPress
Incremental backups only save the changes made since your last backup, helping you reduce storage usage, speed up backups and lower server load. Learn how they work and why they're an essential part of an efficient WordPress backup strategy.
-
Best WordPress Website Builders Compared
Discover the best WordPress website builders for every skill level. Compare features, ease of use, pricing and performance to choose the right builder for your blog, business or online store.