How to back up WordPress to Amazon S3

Backing up WordPress to Amazon S3 gives you an off-site copy of your website that doesn’t depend on your hosting server. If your server goes down, an update breaks your site or your website is compromised, you’ll still have a separate copy of your files and database available when you need to restore them.
One of the backup mistakes we regularly see is storing the only backup on the same server as the website itself. Amazon S3 avoids that problem by keeping your backups in separate cloud storage. It’s also scalable, so you can increase your storage as your website and backup archive grow rather than being tied to a fixed amount of space.
If you’ve never used Amazon Web Services before, the AWS dashboard can look more complicated than it needs to be. Fortunately, you only need to configure a few settings to get started.
In this guide, we’ll show you how to backup WordPress to Amazon S3 using UpdraftPlus, from creating your S3 bucket and setting up secure access to scheduling automatic backups, managing existing backups and restoring your WordPress site if something goes wrong.
Key takeaways
Section titled Key takeaways- Amazon S3 keeps your WordPress backups separate from your hosting account.
- A complete WordPress backup should include both your website files and database.
- S3 storage can grow alongside your website, making it suitable for larger or frequently updated sites.
- Creating a dedicated AWS user limits access to the bucket used for your backups.
- UpdraftPlus can create scheduled WordPress backups and send them directly to Amazon S3.
- Retention settings and S3 lifecycle rules can help control how much storage your backups use.
Why off-site backups matter
Section titled Why off-site backups matterYour WordPress site can contain years of work, from blog posts and customer data to images, settings and custom design work. If something goes wrong, losing all of that can mean hours, days or even longer spent trying to rebuild your site.
That’s why we always recommend keeping at least one backup somewhere separate from your hosting account.
The risks of keeping backups on your web server
Section titled The risks of keeping backups on your web serverMany hosting providers include backups as part of their service, and they’re useful to have. The problem is relying on them as your only backup.
Every host handles backups differently. Some create them more frequently than others, some only keep them for a short time, and you may not always know exactly where they’re being stored. More importantly, if you lose access to your hosting account, you could lose access to the backups stored there too.
Keeping all your backups in the same place leaves you more vulnerable to problems such as:
- Server or hardware failures
- Security incidents affecting your hosting account
- Accidental account suspension or deletion
- Hosting outages that prevent you from accessing your files
Keeping an additional backup in Amazon S3 gives you a separate copy of your site that you can still access if something happens to your hosting account.
Follow the 3-2-1 backup rule
Section titled Follow the 3-2-1 backup ruleA good rule of thumb for backups is the 3-2-1 rule:
- Keep three copies of your data
- Store them in two different places or types of storage
- Keep at least one copy off-site
For a WordPress website, that could mean your live site, a local backup and another backup stored remotely in Amazon S3.
The idea is simple: don’t leave yourself dependent on a single copy of your website. If your hosting server goes down or one backup fails, you still have another copy available to get your site back up and running.
Why choose Amazon S3 for WordPress backups?
Section titled Why choose Amazon S3 for WordPress backups?Amazon S3 is a popular choice for WordPress backups because it gives you plenty of flexibility over how your backup files are stored, who can access them and how long you keep them.
It’s particularly useful for larger or growing websites, WooCommerce stores, agencies and anyone who wants more control than they might get from a general-purpose cloud storage service.
Some of the main benefits include:
- Scalable storage: Your storage can grow alongside your website, so you don’t need to move your backups elsewhere as your site gets bigger.
- Pay-as-you-go pricing: You pay based on the storage and data transfer you actually use rather than committing to a fixed monthly allowance.
- Detailed access controls: AWS Identity and Access Management (IAM) lets you create dedicated users with access only to the S3 bucket used for your backups.
- Private storage: Your backup files can be kept private and away from public access.
- Lifecycle rules: You can automatically move or delete older backups after a set period, which can help keep storage costs under control.
- Reliable storage: Amazon S3 is designed for high durability, helping you keep backup files safely stored over the long term.
The main trade-off is that Amazon S3 takes a little more setup than services such as Google Drive, Dropbox or OneDrive. Once it’s configured, though, it gives you much more control over how your WordPress backups are stored and managed.
If you’d prefer something simpler to set up, one of those cloud storage solutions may be a better fit.
Before you begin the Amazon S3 setup
Section titled Before you begin the Amazon S3 setupBefore connecting WordPress to Amazon S3, you need to create a storage bucket and set up a dedicated AWS user that has permission to access it.
For this guide, you will only need to use two AWS services:
- Amazon S3, where your backups will be stored
- Identity and Access Management (IAM), which controls how UpdraftPlus connects to the bucket
The next steps will walk you through each part of the setup and explain the settings you need to change.
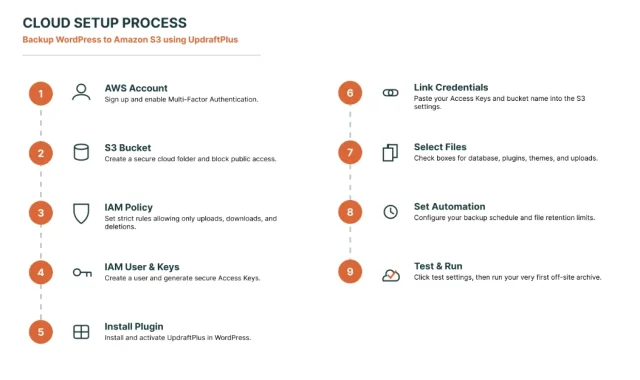
Step 1. Create an AWS account
Section titled Step 1. Create an AWS accountIf you do not already have one, create an account on the Amazon Web Services (AWS) website. During registration you will be asked to provide your contact details, payment information and a phone number for account verification.
Once your account is set up, sign in to the AWS Management Console.
The AWS dashboard contains a wide range of services, but for this guide you only need Amazon S3 and Identity and Access Management (IAM).
Before you continue, it is also worth enabling multi-factor authentication (MFA) on your AWS account to add an extra layer of security.
Step 2. Setting up your digital storage bucket
Section titled Step 2. Setting up your digital storage bucketAn Amazon S3 bucket is where your WordPress backups will be stored.
From the AWS Management Console, search for S3 and open the service. Then click Create bucket.
When creating your bucket:
- Choose a unique bucket name, ideally including your domain name.
- Use only lowercase letters, numbers and hyphens.
- Select the AWS region closest to your website or your primary audience.
- Leave the recommended Object Ownership settings unchanged.
- Keep Block all public access enabled so your backups cannot be accessed publicly.
Once you have reviewed the settings, click Create bucket.
Step 3. Creating a secure IAM policy for your backups
Section titled Step 3. Creating a secure IAM policy for your backupsRather than connecting UpdraftPlus to your main AWS account, it is better to create a dedicated IAM policy with access only to your backup bucket. This follows AWS security best practices and limits what the plugin can access.
Open IAM from the AWS Management Console and select Policies > Create policy.
Choose the JSON editor and paste in the policy shown below, replacing your-bucket-name with the name of the bucket you created.
{
    "Version": "2012-10-17",
    "Statement": [
        {
            "Effect": "Allow",
            "Action": [
                "s3:PutObject",
                "s3:GetObject",
                "s3:DeleteObject",
                "s3:ListBucket"
            ],
            "Resource": [
                "arn:aws:s3:::your-bucket-name",
                "arn:aws:s3:::your-bucket-name/*"
            ]
        }
    ]
}
Once you have updated the bucket name, click Next, give the policy a descriptive name, such as WebsiteBackupPolicy, and save it.
Step 4. Create an IAM user and generate access keys
Section titled Step 4. Create an IAM user and generate access keysNext, create a dedicated IAM user that will use the policy you have just created.
In IAM, open Users and click Create user. Give the user a descriptive name, such as WebsiteBackupUser.
When prompted, attach the custom policy you created in the previous step.
After the user has been created:
- Open the user’s Security credentials tab.
- Generate a new Access key.
- Select Application running outside AWS when asked how the key will be used.
AWS will generate two values:
- Access key ID
- Secret access key
Save both of these somewhere secure, such as a password manager. AWS only displays the Secret access key once, so if you lose it, you will need to generate a new one.
Connecting WordPress to Amazon S3 with UpdraftPlus
Section titled Connecting WordPress to Amazon S3 with UpdraftPlusNow that your Amazon S3 bucket has been created, the next step is to connect it to your WordPress website.
UpdraftPlus makes this straightforward by letting you connect Amazon S3 directly from your WordPress dashboard. Once everything is configured, the plugin can automatically back up your website files and database to your S3 bucket on a schedule you choose.
Back up to Amazon S3 without lifting a finger
Set it once and let UpdraftPlus Premium do the rest. Schedule automatic WordPress backups to Amazon S3 and keep a secure, off-site copy ready whenever you need to restore your site.
Step 5. Installing and activating UpdraftPlus
Section titled Step 5. Installing and activating UpdraftPlus- Log in to your WordPress dashboard and go to Plugins > Add New Plugin.
- Search for UpdraftPlus, then click Install Now followed by Activate.
- Once the plugin has been activated, go to Settings > UpdraftPlus Backups to open the plugin dashboard.
Step 6. Connect Amazon S3 to UpdraftPlus
Section titled Step 6. Connect Amazon S3 to UpdraftPlus- Go to UpdraftPlus > settings tab.
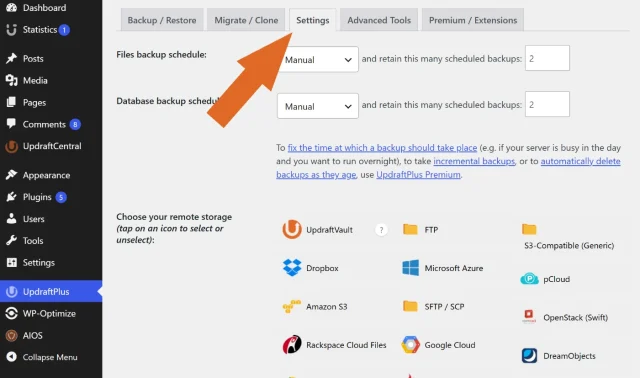
- You will see a grid of different remote storage icons representing various cloud providers. Click on the Amazon S3 icon to select it as your primary destination.
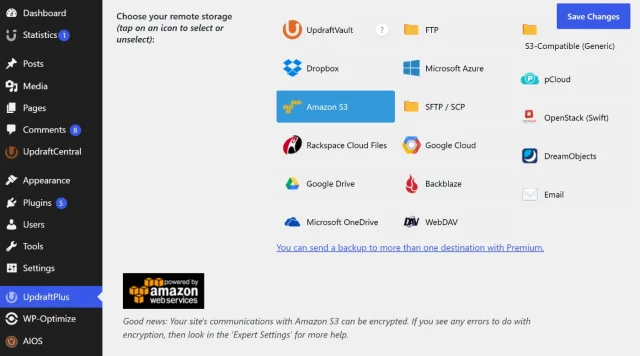
- Scroll down to the Choose your remote storage section and select the Amazon S3 icon.
- The Amazon S3 settings will appear below. Enter the following information:
- Your Access key ID
- Your Secret access key
- The name of your S3 bucket
Leave the Storage class set to Standard unless you have a specific reason to change it.
Once you have entered your details, click Test Amazon S3 Settings to check that UpdraftPlus can connect to your bucket. If the test is successful, you are ready to continue.
If the connection fails, double-check that your bucket name, access key and secret access key have been entered correctly.
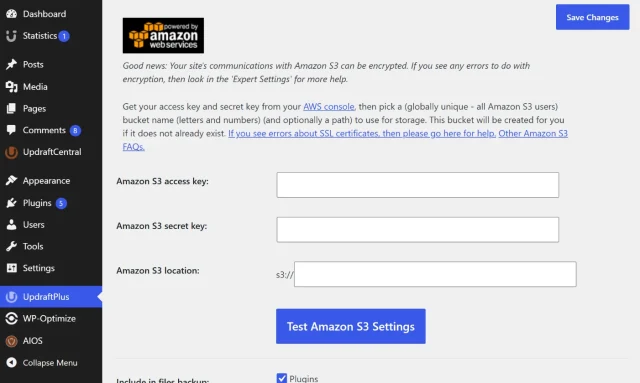
- Locate the small link labeled Test Amazon S3 settings > Click this link
If your permissions were set up correctly a success window will pop up confirming that the plugin can communicate with your bucket. If it fails, double check that your bucket name matches exactly and that there are no accidental spaces in your keys.
Step 7. Choose what to include in your backups
Section titled Step 7. Choose what to include in your backupsScroll further down the Settings page to choose which parts of your website you want to back up.
For a complete WordPress backup, make sure the following options are selected:
- Plugins
- Themes
- Uploads
- Any other directories found inside wp-content
These options ensure your plugins, themes, media library and any additional files stored in your wp-content folder are included in your backups.
By default, UpdraftPlus excludes temporary cache files and other unnecessary data. In most cases, it is best to leave these default exclusions in place, as they help reduce backup size without affecting your ability to restore your website.
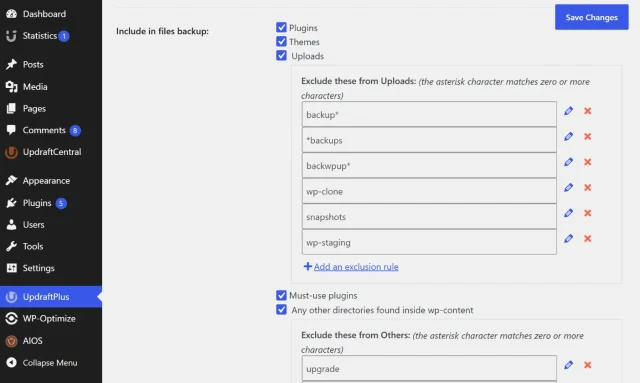
You will also see a section for exclusion rules directly below each category. By default the plugin automatically excludes system cache folders and temporary backup logs. Leave these exclusions in place because saving temporary cache data only serves to bloat your cloud storage bucket and increase your transfer times unnecessarily.
Step 8. Setting up automated schedules and retention counts
Section titled Step 8. Setting up automated schedules and retention countsReturn to the top of the Settings page and choose how often you want to back up your website files and database.
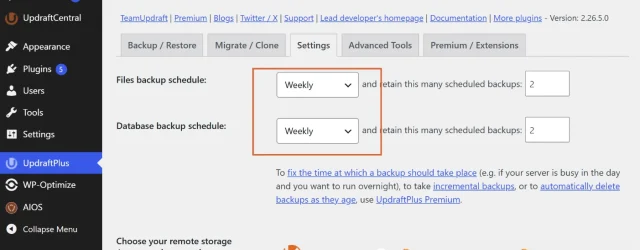
Your database changes more frequently than your website files, as it stores your posts, pages, comments, users and website settings. Your files include your themes, plugins, media library and other WordPress files.
A good starting point is:
Next to each schedule, choose how many backup copies you want to keep.
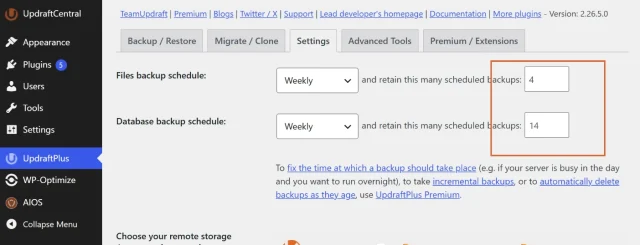
For many business websites, keeping four file backups and 14 database backups provides a good balance between having enough restore points and managing your Amazon S3 storage.
As new backups are created, UpdraftPlus automatically removes older ones based on the retention settings you choose. This helps keep your storage organised and prevents your Amazon S3 bucket from filling up with outdated backups.
Step 9. Testing the S3 connection and running your first backup
Section titled Step 9. Testing the S3 connection and running your first backupScroll to the bottom of the Settings page and click Save Changes to save your Amazon S3 settings and backup schedule.
Next, open the Backup / Restore tab and click Backup Now.
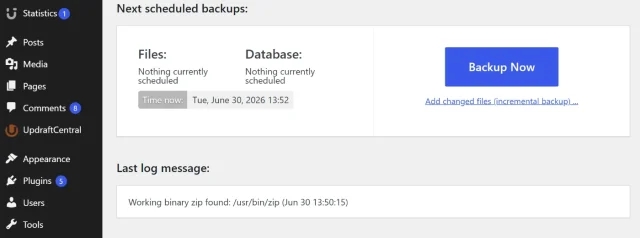
In the confirmation window, make sure the following options are selected:
- Include your database in the backup
- Include your files in the backup
- Send this backup to remote storage
Click Backup Now to start the backup.
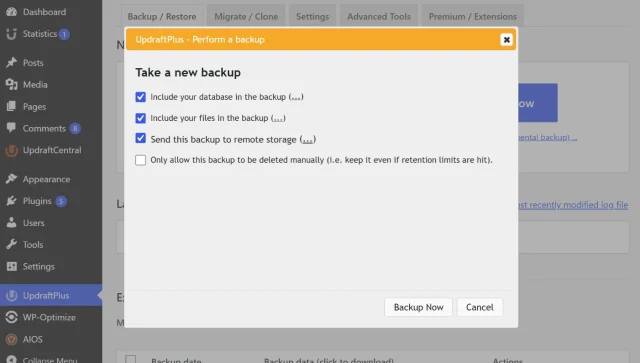
UpdraftPlus will create your backup and upload it to your Amazon S3 bucket. Depending on the size of your website, this may take a few minutes.
Once the backup has finished, it should appear in the Existing Backups section with the Amazon S3 icon next to it. It is also worth logging in to your AWS account and checking that the backup files have been uploaded to your S3 bucket successfully.
How to restore your WordPress website from Amazon S3
Section titled How to restore your WordPress website from Amazon S3Backing up your website is only useful if you know you can restore it. UpdraftPlus makes this straightforward by allowing you to restore your backups directly from Amazon S3 whenever you need them.
Whether you are recovering from a failed update or rebuilding your website after a more serious issue, the process is largely the same.
Restore your website when you can still access WordPress
Section titled Restore your website when you can still access WordPressIf you can still log in to your WordPress dashboard, restoring a previous backup only takes a few minutes.
- Go to Settings > UpdraftPlus Backups.
- Scroll down to the Existing Backups section.
- Find the backup you want to restore and click Restore.
- Select the components you want to restore, such as your database, plugins, themes and uploads.
- Click Next and confirm the restore.
UpdraftPlus will download the required backup files from Amazon S3 and restore your website automatically.
Once the restore has finished, clear your browser cache and check that your website is working as expected.
Restoring from a fatal error or complete site crash
Section titled Restoring from a fatal error or complete site crashIf you can no longer access your WordPress dashboard, you can still recover your website using the backups stored in Amazon S3.
To do this:
- Install a fresh copy of WordPress on your hosting account.
- Install and activate UpdraftPlus.
- Reconnect UpdraftPlus to your Amazon S3 bucket using your Access key ID, Secret access key and bucket name.
- Open the Backup / Restore tab and select Rescan remote storage.
- Once your backups appear, click Restore next to the backup you want to use.
- Select all backup components and complete the restore.
UpdraftPlus will download the backup from Amazon S3 and restore your website, helping you get back online as quickly as possible.
Protect every update with automatic backups
Automatic backups are a great start, but UpdraftPlus Premium offers even more protection with incremental backups, advanced scheduling and automatic backups before WordPress, plugin and theme updates.
Best practices for storing WordPress backups in Amazon S3
Section titled Best practices for storing WordPress backups in Amazon S3Once your WordPress backups are being sent to Amazon S3, there are a few things worth doing to keep them secure and easy to manage. Most only take a few minutes to set up, but they can save you a lot of trouble later.
- Keep your AWS access keys private: Never share your Access key ID or Secret access key, and don’t post them in support forums, emails or anywhere they could be seen by someone else.
- Use a dedicated IAM user: Rather than connecting UpdraftPlus using your main AWS account, create a dedicated IAM user that only has access to the S3 bucket used for your backups.
- Remove access you no longer need: If you create temporary users or access keys for a developer or another team member, remove them once they’re no longer needed.
- Protect your AWS account: Enable multi-factor authentication (MFA) and use a strong, unique password. A password manager can make this much easier to manage.
- Check your backups occasionally: Review your backup schedule and retention settings from time to time. This helps make sure you’re keeping enough restore points without holding onto old backups you no longer need.
For an extra layer of protection, you can also enable S3 Versioning on your bucket. This keeps previous versions of files, which can help if a backup file is accidentally deleted or overwritten.
Add extra protection to your WordPress backups
Section titled Add extra protection to your WordPress backupsIt’s also worth thinking about the security of the backup files themselves, particularly if your WordPress database contains customer details or other sensitive information.
If you’re using UpdraftPlus Premium, you can encrypt your WordPress database backups so the data can’t easily be read if someone gains access to the backup file. You can also password-protect your UpdraftPlus settings, helping prevent other WordPress users from changing your backup configuration.
For websites that handle personal or customer information, data anonymisation gives you another option. It can replace sensitive personal information in your database, which is particularly useful if you’re restoring a copy of your website to a staging or development environment.
Test your backups too
Section titled Test your backups tooFinally, don’t assume that a successful backup means your job is done. A backup is only useful if you can restore from it, so it’s worth running a test restore occasionally on a staging site or test environment.
This gives you a chance to check that your files and database have been backed up correctly and that you know how the restore process works. If you ever do need to recover your live site, you won’t be figuring it out for the first time while something is already wrong.
Conclusion
Section titled ConclusionStoring your WordPress backups in Amazon S3 gives you an independent copy of your website that is separate from your hosting account. Once everything is configured, UpdraftPlus Premium can automatically create backups and store them securely in your S3 bucket, ready whenever you need to restore your website.
Although setting up Amazon S3 takes a little longer than services such as Dropbox or OneDrive, the additional flexibility, scalability and security make it an excellent choice for growing websites, businesses and agencies. Taking the time to configure it properly now can make recovering your website much simpler if something goes wrong in the future.
If you prefer not to manage an AWS account, buckets and access keys yourself, UpdraftVault offers a simpler alternative. Built on Amazon S3 technology and designed specifically for UpdraftPlus, it provides the same reliable off-site storage with a much quicker setup and seamless integration.
Whether you choose Amazon S3 or UpdraftVault, UpdraftPlus Premium makes it easy to automate your backups, keep them safely stored off-site and restore your website quickly if the unexpected happens.
FAQs
Section titled FAQsCan I automatically back up WordPress to Amazon S3?
Yes. With UpdraftPlus Premium, you can schedule automatic WordPress backups and send them directly to Amazon S3. Once everything is configured, new backups are uploaded automatically based on the schedule you choose.
Do I need an AWS account to use Amazon S3?
Yes. Amazon S3 is part of Amazon Web Services (AWS), so you’ll need an AWS account before you can create an S3 bucket and connect it to WordPress.
Can I restore my WordPress website from Amazon S3?
Yes. If your backups are stored in Amazon S3, UpdraftPlus can restore your website directly from your S3 bucket. This applies whether you’re restoring after a failed update or rebuilding your site on a new WordPress installation.
Is Amazon S3 a good place to store WordPress backups?
Amazon S3 is a reliable choice because it keeps your backups separate from your hosting account and allows your storage to grow alongside your website. It also gives you more control over security and storage management than many consumer cloud storage services.
Is Amazon S3 free?
?Amazon offers a Free Tier for new AWS accounts, but this has limits and may not apply indefinitely. Once you move beyond the Free Tier, you’ll pay for the storage you use and any associated requests or data transfer, making it a flexible option for websites of all sizes.
Can I use an Amazon S3 backup to migrate my WordPress site?
Yes. If you’ve stored your WordPress backup in Amazon S3 using UpdraftPlus, you can use that backup when migrating your site to another host or server. Install UpdraftPlus on the destination site, connect it to your Amazon S3 storage and restore the backup there. UpdraftPlus Premium’s migration features can also handle the URL and database changes needed when moving to a new domain.
About the author

Ivan Đukić
Ivan is the Product Manager for UpdraftPlus. With a background as a full-stack developer, he’s spent years building custom features, plugins, and tools. Often working side by side with product and marketing teams to bring ideas to life. Comfortable across the full lifecycle, from shaping concepts to QA and support, he found product management to be a natural next step. Today, Ivan focuses on turning complex needs into reliable, user-friendly solutions that help WordPress site owners protect and manage their websites with confidence.
Categories
UpdraftPlus
Get all our premium features. Direct site-to-site migration, incremental backups, back up automatically before updates and a whole lot more.
From just $70 for the year.
More stories
-

5 WordPress Web Design Tips to Improve Your Website
Good web design is about more than appearance. Explore practical WordPress web design tips to improve your website's layout, navigation, mobile responsiveness, accessibility and performance, helping you create a better experience for your visitors.
-
Best AI Website Builders Compared
AI website builders can help you design, write and launch a website in minutes. Compare the best AI-powered website builders based on ease of use, features, customisation, pricing and performance to find the right solution for your next project.
-

How incremental backups save time and storage in WordPress
Incremental backups only save the changes made since your last backup, helping you reduce storage usage, speed up backups and lower server load. Learn how they work and why they're an essential part of an efficient WordPress backup strategy.
-
Best WordPress Website Builders Compared
Discover the best WordPress website builders for every skill level. Compare features, ease of use, pricing and performance to choose the right builder for your blog, business or online store.