How to optimize images for WordPress

If you’re trying to work out how to optimize images for WordPress, you’re in the right place. Images are often the biggest files on a page, so it’s no surprise they’re one of the most common causes of slow-loading websites.
We’ve looked at plenty of WordPress sites where people have installed caching plugins, enabled a CDN and ticked all the usual performance boxes, only to discover they’re still uploading 5 MB photos straight from a phone or camera. No amount of caching can fully compensate for images that are much larger than they need to be.
The good news is that image optimisation is one of the quickest ways to speed up your WordPress site. A few simple changes can reduce page size, improve loading times and create a smoother experience for your visitors. Choosing the right file format, resizing images before you upload them and compressing them properly can make a noticeable difference without affecting how your images look.
In this guide, we’ll show you how to optimise images for WordPress step by step, including how to automate parts of the process so you don’t have to optimise every image manually.
Key takeaways
Section titled Key takeaways- Optimise images before uploading them to WordPress by choosing the right format, dimensions and compression settings.
- Use JPEG or WebP for photographs, and PNG or WebP for graphics that need transparency.
- Resize images to match the maximum size they’ll be displayed on your website to avoid uploading unnecessarily large files.
- Compress images to reduce file size while maintaining good image quality, helping improve page speed and Core Web Vitals.
- Use descriptive file names and meaningful alt text to improve image SEO and accessibility.
- Automate tasks like image compression and WebP conversion with WP-Optimize to save time and keep your site performing well as it grows.
WordPress image optimisation checklist
Section titled WordPress image optimisation checklist☐ Choose the right image format
☐ Resize the image to fit your layout
☐ Compress the image
☐ Use a descriptive file name
☐ Upload the image to WordPress
☐ Add descriptive alt text
☐ Check how the image looks on mobile devices
Why image optimisation matters
Section titled Why image optimisation mattersImage optimisation is the process of reducing an image’s file size while maintaining good visual quality. The goal is simple: deliver images that load quickly without noticeably affecting how they look.
Images are often the largest files on a WordPress page. Every time someone visits your website, their browser has to download those images before they can be displayed. Larger files take longer to load, especially on slower internet connections and mobile devices.
Optimising your images can help you:
- Improve page speed: Smaller images load faster, creating a better experience for your visitors.
- Support Core Web Vitals: Large images can delay Largest Contentful Paint (LCP), one of Google’s most important page experience metrics.
- Boost SEO: Faster pages can contribute to better search performance.
- Reduce storage and bandwidth: Smaller files use less server space and transfer less data.
Recommended image formats
Section titled Recommended image formatsJPEG remains a strong choice for photographs and complex imagery.
PNG is best reserved for graphics that require transparency, such as logos and icons.
WebP offers the best balance of quality and performance for most websites. It supports transparency while delivering significantly smaller file sizes than traditional formats.
Recommended image dimensions for WordPress
Section titled Recommended image dimensions for WordPress- Featured image: 1200 × 630
- Blog image: 1200 × 800
- Hero banner: 1920 × 1080
- WooCommerce product image: 800 × 800
- Sidebar image: 600 × 400
These dimensions won’t suit every theme, but they provide a sensible starting point for most modern WordPress websites.
Real-world optimisation example
Section titled Real-world optimisation example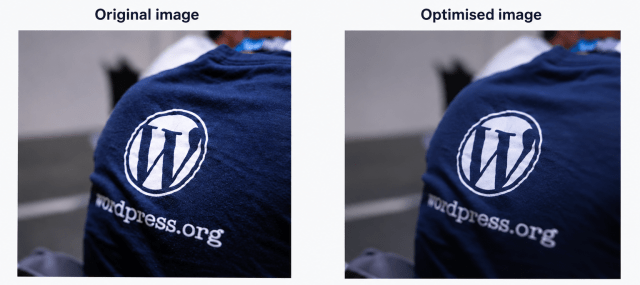
Original image:
• JPEG
• 4.8 MB
• 6000 × 4000
Optimised image:
• WebP
• 180 KB
• 1200 × 800
Result:
More than 95% reduction in file size with minimal visible difference.
The hidden trap of fixing images inside the dashboard
Section titled The hidden trap of fixing images inside the dashboardAutomated compression plugins are highly valuable tools for cleaning up historic uploads or managing multi-author blogs, however, relying on them as your primary optimization strategy creates hidden complications.
Every time you upload an image, WordPress automatically creates multiple duplicate versions behind the scenes. By default, it generates a thumbnail, a medium size, and a large size. If your theme requires specific dimensions for custom grid blocks or sidebars, that single upload can quietly spawn up to ten distinct image variations on your server.
If you upload a massive, uncompressed photograph straight from a digital camera or stock library, your server has to spend valuable processing power generating all those downscaled variations. If you are using a shared hosting environment, this massive spike in CPU usage can slow your entire site down for every active visitor or even trigger transient database errors.
Understanding how to manage optimization before clicking the upload button ensures your media pipeline stays exceptionally clean in the long term.
How to optimize images for your WordPress site
Section titled How to optimize images for your WordPress siteThe most effective way to handle this process without spending hours tweaking files manually is to adopt a hybrid workflow. This means combining smart local habits with a reliable performance plugin that automates the technical execution inside your dashboard.
An excellent tool for this approach is WP-Optimize. Instead of relying on separate, fragmented web applications to convert, resize and compress your media assets one by one, a comprehensive speed utility allows you to configure rules once and let the software execute them perfectly behind the scenes.
By setting up an automated performance pipeline, you get the best of both worlds. You maintain total creative control over how your images are labeled and structured on your computer, while the technical conversion processes happen effortlessly the exact second your media lands in your library. Let’s look at how this breaks down across the four core phases of image preparation.
Stop manually optimising every image you upload
Every oversized image can slow down your site and hurt your Core Web Vitals. WP-Optimize Premium automatically compresses newly uploaded images and creates WebP versions in the background, helping you reduce file sizes without adding extra steps to your workflow.
Phase one: Choose the right image format
Section titled Phase one: Choose the right image formatOptimising an image starts before you upload it to WordPress. Choosing the right file format can make a big difference to file size and page speed while keeping your images looking sharp.
JPEG vs PNG
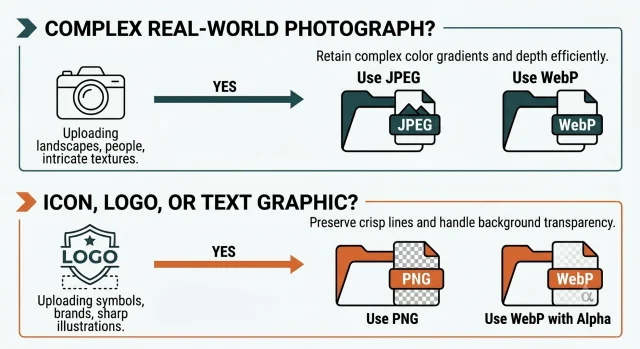
Section titled JPEG vs PNGJPEG is usually the best choice for photographs and other detailed images. It uses lossy compression to reduce file size, making it ideal for product photos, blog images and banners where keeping pages fast is more important than preserving every tiny detail.
PNG is better suited to graphics with sharp edges, text or transparent backgrounds. Logos, icons, screenshots and illustrations often look better as PNG files because they retain more detail and support transparency. The trade-off is that PNG files are usually larger than JPEGs.
As a general rule, use JPEG for photos and PNG only when you need transparency or crisp graphics.
Consider using WebP
Section titled Consider using WebPWhile JPEG and PNG are still widely used, WebP is now one of the best image formats for WordPress websites. It offers excellent compression while maintaining image quality and also supports transparency, making it suitable for both photographs and graphics.
In many cases, WebP images are 25% to 35% smaller than equivalent JPEG or PNG files without a noticeable loss in quality. Smaller files load faster, helping improve page speed and the overall user experience.
As a general guide:
Uploading a photograph? Use JPEG or WebP.
Uploading a logo, icon or graphic with transparency? Use PNG or WebP.
Automatically convert images to WebP in WordPress
Section titled Automatically convert images to WebP in WordPressYou don’t have to convert every image manually before uploading it to WordPress. WP-Optimize Premium can automatically convert supported images to WebP as you upload them, helping reduce file sizes while keeping your workflow simple.
To get started:
- Install and activate WP-Optimize Premium. If you don’t already have it installed, go to Plugins > Add New, search for WP-Optimize, then install and activate it. You can also download the free version from the WordPress Plugin Directory.
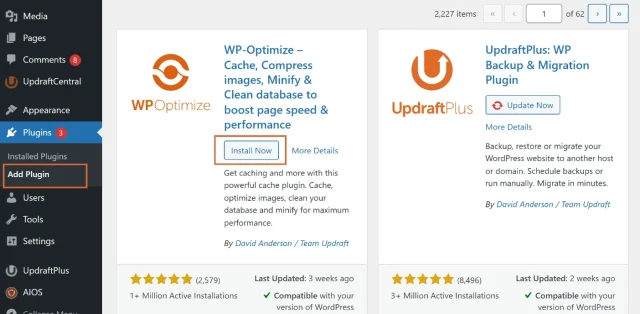
- Log in to your WordPress dashboard, then go to WP-Optimize > Images.
- Open the Compress images tab and scroll down to the WebP conversion section.
- Enable Create WebP version of image to automatically generate WebP versions of supported images.
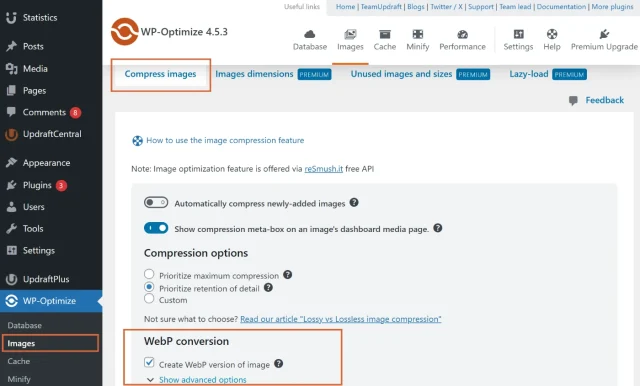
- WP-Optimize will save this setting and automatically create WebP versions of supported images you upload in the future.
Once enabled, you can continue uploading JPEG and PNG images as normal. WP-Optimize will automatically generate WebP versions during upload, helping reduce image file sizes and improve page load times without adding extra steps to your workflow.
Phase: Resize images to the correct dimensions
Section titled Phase: Resize images to the correct dimensionsOne of the most common image optimisation mistakes is uploading images that are much larger than they need to be. It’s important to understand the difference between an image’s dimensions and its file size.
- Image dimensions are the width and height of an image, measured in pixels. For example, 6000 × 4000 pixels.
- File size is the amount of storage the image uses, measured in kilobytes (KB) or megabytes (MB). For example, 4.5 MB.
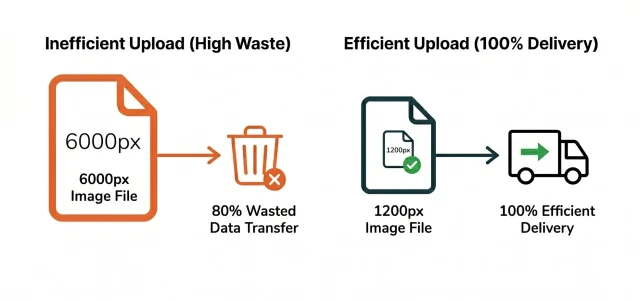
When you purchase a high-quality stock photo or snap a picture on an updated mobile device, the physical dimensions are often massive. However, your WordPress theme has physical structural limits. If your blog post reading column is designed to display content at a maximum width of 1200 pixels, uploading a 6000-pixel-wide asset means you are forcing your visitor’s browser to download five times more pixel data than their device can physically display.
The browser will automatically scale the massive image down on the fly to fit inside the 1200-pixel container, but the damage is already done. The visitor has expended unnecessary mobile data, the server has transferred wasted bytes, and your page speed metrics will suffer.
To resolve this, open your local photo editor, web tool, or design program and change the physical dimensions before exporting. As a general operational rule for modern websites, standard layout regions benefit from consistent structural ranges.
- Full-width hero banners: 1920 pixels wide by 1080 pixels high
- Standard blog post illustrations: 1200 pixels wide by 800 pixels high
- Sidebar or content highlights: 800 pixels wide by 600 pixels high
- Square product thumbnails: 600 pixels wide by 600 pixels high
Step-by-step setup for controlling media size accumulation with wp-optimize
Section titled Step-by-step setup for controlling media size accumulation with wp-optimizeEven when you resize files locally, your WordPress theme can generate hidden background sizes that bloat your server disk space. WP-Optimize Premium gives beginners full control over this back-end accumulation through a clear, click-based layout:
- Open your dashboard, click on WP-Optimize, head to the Images panel and select the Image tools tab
- Scan for unused sizes: Click the button labeled Scan for unused image sizes to let the plugin map your media directory
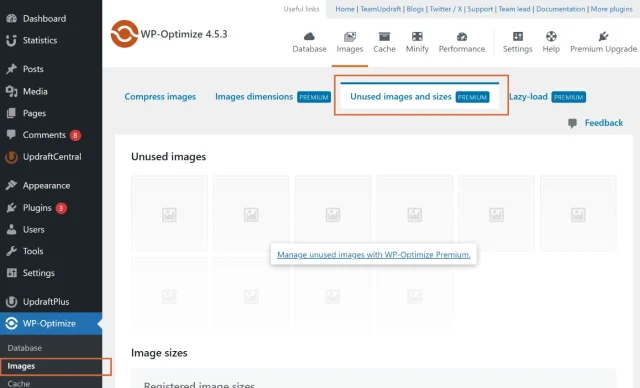
- Analyze the findings: Review the generated list showing exactly which layout sizes your active theme ignores completely
- Purge and clean: Select the redundant sizes and click the clean option to wipe them out, instantly recovering server space
By performing this simple check once a month, you keep your server directory lean without risking your live layout designs.
Phase three: Compress your images
Section titled Phase three: Compress your imagesOnce you’ve chosen the right file format and resized your image, the next step is compression. Compressing images reduces file size, helping your pages load faster while maintaining good image quality.
There are two main types of image compression:
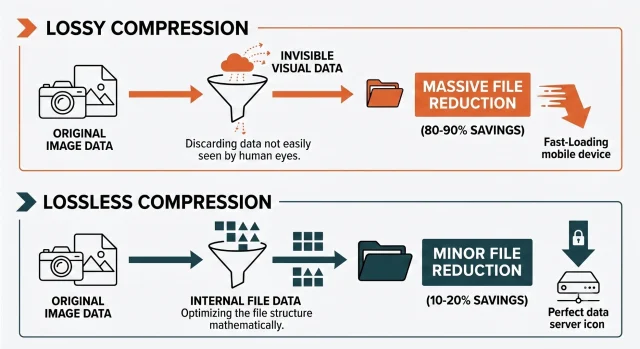
- Lossy compression removes some image data to create much smaller file sizes. In most cases, the difference in quality is barely noticeable, making it the best choice for photographs and most website images.
- Lossless compression reduces file size without removing image data. It preserves the original image quality but usually results in larger files than lossy compression.
For most WordPress websites, lossy compression provides the best balance between image quality and page speed.
As a general rule, aim for an image quality setting of around 80% when saving JPEG or WebP images. This usually provides a good balance between image quality and file size, helping pages load faster without any noticeable reduction in quality for most visitors.
Already have hundreds of images in your media library?
Optimising new uploads is only half the battle. WP-Optimize Premium can bulk-compress existing images and convert them to WebP, helping you improve performance across your entire media library without manually editing every file.
Setting up automatic image compression with WP-Optimize
Section titled Setting up automatic image compression with WP-OptimizeWP-Optimize can automatically compress images as you upload them, helping reduce file sizes and keep your website running quickly without any extra work.
To enable automatic image compression:
- Go to WP-Optimize > Images and open the Image compression tab.
- Choose a compression level:
- Prioritise maximum compression for the smallest file sizes.
- Prioritise retention of detail to preserve more image quality.
- Custom to choose your own settings.
- Enable Automatically compress newly added images.
- To optimise existing images, select the images you want to compress, then click Compress the selected images.
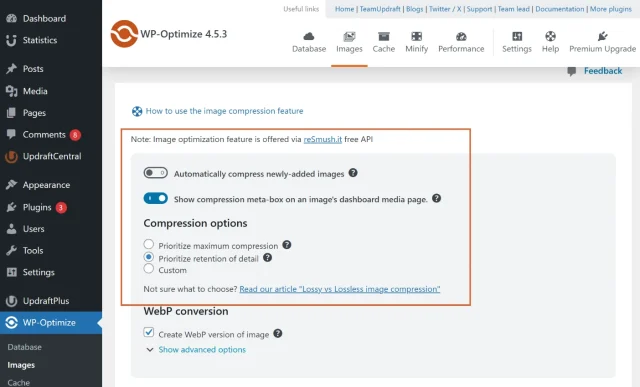
Once enabled, WP-Optimize will automatically compress new images as they’re uploaded. You can also use the same tool to optimise images that are already in your Media Library.
Phase four: Organising file names and image SEO
Section titled Phase four: Organising file names and image SEOImage optimisation isn’t just about improving page speed. Giving your images clear, descriptive file names can also help search engines understand what they’re showing and how they relate to your content.
Before uploading an image to WordPress, rename it to describe what’s in the image. Instead of leaving a file name like IMG_9482.jpg or shutterstock_final_v2_edit.png, use something meaningful, such as organic-cold-brew-coffee.jpg.
When naming image files:
- Use short, descriptive file names.
- Separate words with hyphens rather than underscores.
- Use lowercase letters and avoid unnecessary numbers or special characters.
- Include relevant keywords where they fit naturally, but don’t force them into every file name.
Descriptive file names won’t transform your rankings on their own, but they’re an important part of image SEO and help create a well-optimised website.
Image optimisation isn’t just about page speed. We’ve seen websites invest heavily in content creation but overlook basic image naming and alt text. Those small details help search engines understand your content more clearly and often get missed because they’re not as visible as performance scores or rankings.
How to upload and maintain optimised images
Section titled How to upload and maintain optimised imagesOnce your images have been formatted, resized, compressed and given descriptive file names, you’re ready to upload them to WordPress. Following this workflow helps keep your Media Library organised while improving your site’s performance.
After uploading an image, take a moment to complete the remaining image settings. This includes adding descriptive alt text, which helps screen readers understand the image and can provide useful context if the image doesn’t load.
There are many ways to improve your website’s accessibility. Our guides on making your WordPress site accessible and choosing accessible WordPress themes are a good place to start.
When adding alt text:
- Describe the image clearly and concisely.
- Avoid starting with phrases such as “image of” or “photo of”, as screen readers already identify it as an image.
- Leave decorative images empty so screen readers can skip them.
Finally, preview your page on different screen sizes to check that images display correctly before publishing your changes.
Overview table
Section titled Overview tableConclusion
Section titled ConclusionOptimising images for WordPress doesn’t have to be complicated. By choosing the right file format, resizing images before you upload them, compressing them appropriately and using descriptive file names, you can improve page speed without sacrificing image quality.
The real challenge is staying consistent as your website grows. If you’re regularly publishing new content, automating tasks like image compression and WebP conversion can save time while ensuring every new upload follows the same best practices.
WP-Optimize helps you do exactly that. With automatic image compression, WebP conversion and lazy loading, it takes much of the manual work out of image optimisation, making it easier to keep your WordPress site fast as your Media Library grows.
Start by applying these techniques to your next few uploads. Once they’re part of your workflow, you’ll spend less time managing images and more time creating content, while giving your visitors a faster, smoother experience.
FAQs
Section titled FAQsWhat is the best image format for WordPress?
For most websites, WebP offers the best balance of image quality and file size. If you’re preparing images manually, JPEG is usually the best choice for photographs, while PNG works best for graphics that require transparency. Many optimisation plugins can automatically convert uploaded images to WebP.
How large should images be for WordPress?
Images should be sized according to how they’ll appear on your website. For example, a blog post image displayed at 1200 pixels wide doesn’t need to be uploaded at 5000 pixels wide. Resizing images before upload helps reduce page weight and improve loading times.
Does image optimisation improve SEO?
Image optimisation can improve page speed, Core Web Vitals, and user experience, all of which can contribute to stronger search performance. Optimised file names and descriptive alt text can also help search engines better understand your content.
Does WordPress automatically lazy load images?
WordPress includes native lazy loading by default. This means images below the visible part of the page are only loaded when a visitor scrolls towards them, helping pages load faster and reducing unnecessary bandwidth usage.
What should I do if my site already contains thousands of unoptimized images?
Optimising images one by one can be time-consuming on established websites. A plugin such as WP-Optimize can bulk-compress existing images, convert them to WebP, and help improve performance across your entire media library.
Can I restore an image after compressing it?
Many image optimisation plugins keep a backup of the original file for a period of time. If an image loses too much quality after compression, you can usually restore the original version and apply less aggressive settings.
About the author

Elvira Mishra
Elvira has over four years of experience creating and designing content in WordPress. Her background spans multiple digital disciplines, including marketing, SEO, user experience, and human computer interaction.
Categories
WP-Optimize
Get all our premium features. Lazy loading, pre-load key requests, Cloudfare integration. Optimize individual tables, delete unused images and more.
From just $49 for the year.
More stories
-

5 WordPress Web Design Tips to Improve Your Website
Good web design is about more than appearance. Explore practical WordPress web design tips to improve your website's layout, navigation, mobile responsiveness, accessibility and performance, helping you create a better experience for your visitors.
-
Best AI Website Builders Compared
AI website builders can help you design, write and launch a website in minutes. Compare the best AI-powered website builders based on ease of use, features, customisation, pricing and performance to find the right solution for your next project.
-

How incremental backups save time and storage in WordPress
Incremental backups only save the changes made since your last backup, helping you reduce storage usage, speed up backups and lower server load. Learn how they work and why they're an essential part of an efficient WordPress backup strategy.
-
Best WordPress Website Builders Compared
Discover the best WordPress website builders for every skill level. Compare features, ease of use, pricing and performance to choose the right builder for your blog, business or online store.